Dynamic and flexible Environments
Overview
This advanced tutorial explains, how to use Environments and Application Models in a more dynamic way by using scripts to control at which Application Model XDM starts to select data and which Application Models will be selected.
This tutorial builds on the concepts and example objects introduced in the Application Models and Environments tutorial. For details on how to create and configure Application Models and Environments, see Application Models and Environments.
Using Dynamic Start Model and Activation Script
Advanced Row Level Processing (RLP) scenarios often need to support several business use cases on the same set of applications. For example in one case employees should be copied together with the related departments. In another case the department should be copied with dependent employees. This means XDM needs different configurations for both cases. Creating separate Environments for each selection scenario quickly leads to duplicated configuration and, over time, to inconsistencies, because changes are not applied consistently in all places or are made in the wrong place.
This advanced tutorial shows how to avoid that duplication by using:
-
a dynamic start model script to select the appropriate start model at runtime, and
-
an activation script to control which Application Models are active for a specific scenario.
-
Conditions to control the data selection path through related tables.
Example Scenario and Application Models
The following example is based on the sample scenario used in the tutorial. In this example, only one Application Model was used with the following tables.
-
departments
-
dept_emp
-
employees
-
titles
-
salaries
-
dept_manager
In daily work Application Models are built for different applications. So the tables from the example are separated in three different Application Models
Employee, Department, and Salaries. So each Application Model contains one business object. Salaries might be part of an employee, but in this case this
table is placed in its own Application Model to handle this data individually from the other employee data.
Recommended Modelling Approach
A typical approach for the scenario is:
Create three Application Models:
-
one for the core employee entity and titles,
-
one for department structures,
-
one for salaries.
To dynamically control which Application Model will be used to start from the start model script can be used instead of defining a static start model.
The Start Model Script
The start model script is a small piece of Groovy or JavaScript code that decides which Application Model should be used as the start model. The start model script is executed at the beginning of a task execution and has to return one of the installed applications of the Environment which then is used as start model for the data selection.
Scenario Overview
In this scenario, two Data Shops are used which copy different business objects with their dependencies.
-
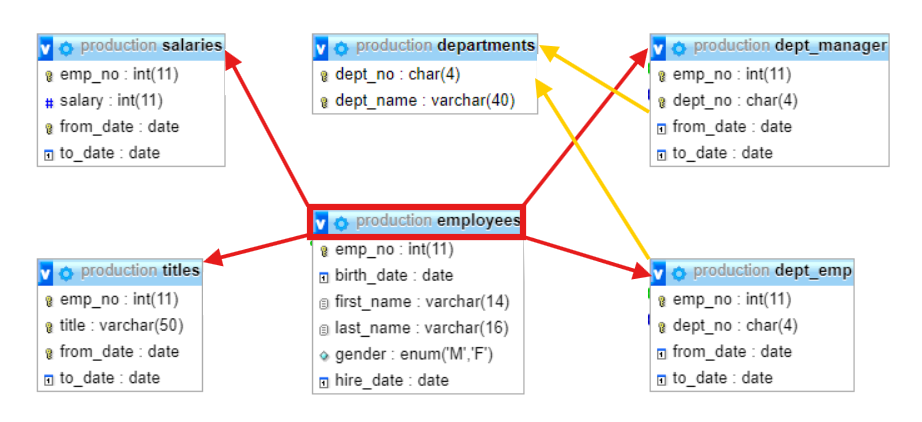
Data Shop – Start From Employees
-
This Data Shop copies employees by specifying a list of employee numbers. It also copies the dependent departments,salaries and titles together with the employees.
-
-
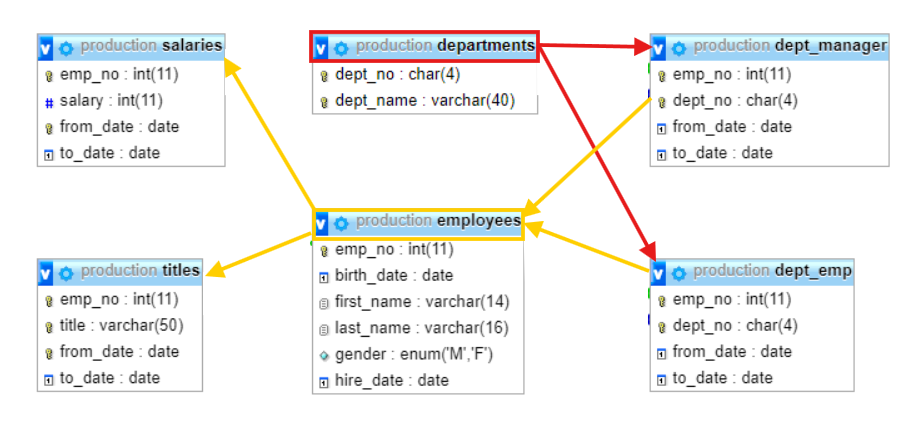
Data Shop - Start From Departments
-
This Data Shop copies departments by specifying a list of department names, also the employees belonging to these departments are copied.
-
Both Data Shops work with the same physical tables and relationships. However, the RLP selection should support two different perspectives:
-
starting from employees and following relations outwards, and
-
starting from departments and following relations outwards.
In a static setup, this would require to use two different Environments with two different Application Models per Environment to build two different selection paths to copy either from employees or from departments. This leads to duplicated configuration and the risk of inconsistent relation definitions.
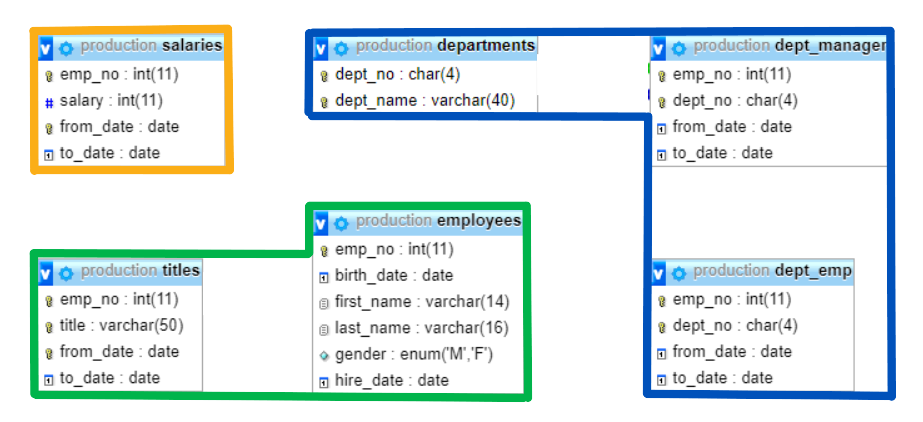
To prepare for dynamic start model selection, the overall schema is therefore divided into several Application Models that group related tables by responsibility and direction of the relations. Each Application Model contains its own set of data relation rules tailored to a specific group of tables and a specific start perspective. In addition, the data relation rules are defined with conditions that control which rules are active in a given scenario. This prevents infinite loops and avoids selecting unintended data.
-
employees + titles
-
salaries
-
departments + dept_manager + dept_emp
One Application Model for each of these table groups. Later, the start model script will decide at runtime which of these Application Models is used as the start point for the data selection.
Create Custom Parameter
Defining a Custom Parameter for Start Model Selection
Create a Custom Parameter that will be used to control the dynamic start model selection and provides a choice between Employees and Departments
-
Configure the general settings:
Name |
StartModelDynamic |
Variable |
startModelDynamic |
Parameter type |
String |
Default value |
leave empty |
Requirement level |
NONE |
Validation type |
None |
Validation expression |
leave empty |
Option entry connection |
leave empty |
option entry expression |
leave empty |
Dynamic option entry |
unchecked |
option entry result limit |
100 |
-
Under options click the plus +
-
Now create two options:
-
Display Name:
Employees, Value:employees -
Display Name:
Departments, Value:departments
-
Creating a Custom Parameter for Department Selection
Create a Custom Parameter named DepartmentNames which will be used to handle the list of departments which should be copied. It will be used in the start condition to select the specified departments from the database.
Configure the Custom parameter as follows:
Name |
DepartmentNames |
Variable |
departmentNames |
Parameter type |
Collection |
Default value |
leave empty |
Requirement level |
NONE |
Validation type |
None |
Validation expression |
leave empty |
Option entry connection |
sample production database |
option entry expression |
|
Dynamic option entry |
checked |
option entry result limit |
100 |
| Use the Collection type here because one or more departments can be selected at the same time. This allows a flexible search and selection of employees across multiple departments. The option entry expression uses the specified connection to read the available departments from the database. With Dynamic option entry enabled, the list of options is generated dynamically at runtime based on the current database content. |
-
below
Dynamic Option Entryclick the button Preview Options. -
A list of the available options for each department will be shown
-
For each option, the value must be changed as shown here:
| Display Name | Value |
|---|---|
Customer Service |
Customer Service |
Development |
Development |
Finance |
Finance |
Human Resources |
Human Resources |
Marketing |
Marketing |
Production |
Production |
Quality Management |
Quality Management |
Research |
Research |
Sales |
Sales |
| The values must exactly match the names used in the database. |
Create Collection Parameter for the Activation Script
Create a Custom Parameter ApplicationModelGroup which will be used to group Application Models. Each Application Model can be part of various groups. The groups will be Employees, Departments, Salaries.
| Property | Value |
|---|---|
Name |
ApplicationModelGroup |
Variable |
aGroup |
Parameter type |
Collection |
Default value |
empty |
Define the possible values of this collection at the bottom of the page as follows:
| Display Name | Value |
|---|---|
Salaries |
|
Departments |
|
Employees |
|
Defining the Custom Parameter for employee numbers
Create a Custom Parameter EmployeeNumber which handles the list of employee numbers that should be copied. It will be used in the start condition to select the specified employees from the database.
| Property | Value |
|---|---|
Name |
EmployeeNumber |
Variable name |
emp_no |
Parameter type |
STRING |
Default value |
<Empty value> |
Requirement level |
NONE |
Validation type |
None |
Validation expression (text/regex) |
<Empty value> |
Option Entry Connection |
<Empty value> |
Option Entry Expression (SQL) |
<Empty value> |
Dynamic Option Entry |
false |
Option Entry Result Limit |
100 |
Options |
No entries defined. |
Application models
Create three Application Models:
-
Employees
-
Departments
-
Salaries
They will be setup in the next steps. At this point we create all of them as an empty object before we create the data relation rules in the Application Models. So we can select the others as reference when creating data relation rules in one of the Application Models.
Creating the Application Model Employees
In the Employees Application Model create a version V1 with the following settings:
-
Modelling connection: select the source modelling connection (Sample production database).
-
Schema: select
production. -
Start table name: select
employees.
Attach the following Custom Parameters to the Application Model Employee
| Name | value |
|---|---|
StartModelDynamic |
Employees |
EmployeeNumber |
empty |
ApplicationModelGroup |
Employees |
Defining the Start Query in Application Model Employees
In the version, navigate to Start Conditions.
Make sure that Row selection mode is set to Query.
In the query field below, enter the following SQL:
SELECT ${uniqueRowIdentifier}
FROM "${startTableSchema}"."${startTableName}" "T"
WHERE "T".emp_no IN (${emp_no})
Then open the panel Table Relation Modelling and create the data relation rules
First Data Relation Rule : employees → salaries
| Setting | Value |
|---|---|
Relation rule name |
|
Base table schema |
|
Base table name |
|
Base table columns |
|
Referenced table schema |
|
Referenced table name |
|
Referenced columns |
|
some of the rules in the Employees Application Model reference other tables.
The data relation rule from employees to salaries is used as an example:
-
Go to the Referenced Table panel. There, you will find a column called Referenced Application Model.
-
Enable this option and select the Salaries Application Model.

Now define under which conditions this data relation rule should be used. This data relation rule should only be applied when the selected start model is Employees.

-
Go to Data relation rules.
-
Open the data relation rule (employees → salaries).
-
At the top, switch to the Condition and adaption tab.
-
Make sure that Libraries is set to Groovy.
-
In the field
Base Table Conditional Script, enter the following script:
scriptCtx.getTaskRuntimeProperty("startModelDynamic") in ["employees"]This means that the data relation rule from employees to salaries is applied whenever the start model is employees. Depending on the specific data relation rule, this script must be adjusted slightly so that each rule is only active for the selection path it should be used for.
This expression returns true if the task runtime property StartModelDynamic is set to either employees and/or departments.
The value of the property is read with scriptCtx.getTaskRuntimeProperty("startModelDynamic") and then compared against the list
["employees", "departments"].
|
Second Data Relation Rule : employees → dept_emp
| Setting | Value |
|---|---|
Relation rule name |
employees → dept_emp |
Base table schema |
production |
Base table name |
employees |
Base table columns |
emp_no |
Referenced table schema |
production |
Referenced table name |
dept_emp |
Referenced columns |
emp_no |
-
employees → dept_emp references Departments
-
employees → dept_emp Base Table Conditional Script ↓
scriptCtx.getTaskRuntimeProperty("startModelDynamic") in ["employees"]
Third Data Relation Rule : employees → dept_manager
| Setting | Value |
|---|---|
Relation rule name |
employees → dept_manager |
Base table schema |
production |
Base table name |
employees |
Base table columns |
emp_no |
Referenced table schema |
production |
Referenced table name |
dept_manager |
Referenced columns |
emp_no |
-
employees → dept_manager references Departments
Fourth Data Relation Rule : employees → titles
| Setting | Value |
|---|---|
Relation rule name |
employees → titles |
Base table schema |
production |
Base table name |
employees |
Base table columns |
emp_no |
Referenced table schema |
production |
Referenced table name |
titles |
Referenced columns |
emp_no |
Setup the Application Model departments as follows.
-
Application Model : Departments
-
version Name: V1
-
start table name : departments
Defining the Start Condition Query in Application Model Departments
In the Version, go to the Start Condition and define the query for the Application Model Departments.
-
Make sure that Row selection mode is set to Query.
-
In the query field, enter the following SQL:
SELECT ${uniqueRowIdentifier}
FROM "${startTableSchema}"."${startTableName}" "T"
WHERE "T".dept_name IN (<#list departmentNames?replace("[","")?replace("]","")?split(",") as x>'${x?trim}'<#sep>, </#sep></#list>)
This start condition selects all rows from the current start table where the column dept_name matches the value of the Custom Parameter departmentNames.
Because the Custom Parameter departmentNames is defined as a Collection, it does not hold a single value but a list of values.
This example uses a Freemarker Expression to format the value of the Custom Parameter so that it can be used in an SQL select statement.
Without the formatting the value would be used as [Customer Service, Development, Finance]
The expression in the WHERE clause does exactly this:
-
It first removes brackets from the collection representation
?replace("[","")?replace("]","") -
It then splits the remaining text into individual items
?split(",") -
Then the list of items is joined to one string with
<#list … as x>'${x?trim}'<#sep>, </#sep></#list> -
Where
<#list … as x> … </#list>joins the items to one list -
<#sep>, </#sep>separates the items in the string by a comma and a blank -
'${x?trim}'removes all leading and trailing blanks and surrounds each single item with apostrophes.
| Before the FreeMarker expression is applied, the departmentNames parameter is just a collection representation like [Customer Service, Development, Finance]. After the expression has been evaluated-removing brackets and quotes, splitting the text, joining them with commas it becomes a valid SQL IN clause fragment: ('Customer Service', 'Development', 'Finance'). |
Attach the following Custom Parameters to the Application Model Departments
| Name | value |
|---|---|
StartModelDynamic |
Departments |
DepartmentNames |
empty |
ApplicationModelGroup |
Departments |
Department Data Relation Rules
Ensure that Libraries is set to Groovy for each of the following Data Relation Rules.
This setting must be configured manually in every Data Relation Rule.
|
| Name | Base Table | Columns | Referenced Table | Referenced Columns | References Application Model | Conditional Script |
|---|---|---|---|---|---|---|
dept_emp → departments |
dept_emp |
dept_no |
departments |
dept_no |
/ |
scriptCtx.getTaskRuntimeProperty("startModelDynamic") in ["employees"] |
dept_manager → departments |
dept_manager |
dept_no |
departments |
dept_no |
/ |
scriptCtx.getTaskRuntimeProperty("startModelDynamic") in ["employees"] |
departments → dept_manager |
departments |
dept_no |
dept_manager |
dept_no |
/ |
scriptCtx.getTaskRuntimeProperty("startModelDynamic") in ["departments"] |
departments → dept_emp |
departments |
dept_no |
dept_emp |
dept_no |
/ |
scriptCtx.getTaskRuntimeProperty("startModelDynamic") in ["departments"] |
dept_manager → employees |
dept_manager |
emp_no |
employees |
emp_no |
references Employees |
scriptCtx.getTaskRuntimeProperty("startModelDynamic") in ["departments"] |
dept_emp → employees |
dept_emp |
emp_no |
employees |
emp_no |
references Employees |
scriptCtx.getTaskRuntimeProperty("startModelDynamic") in ["departments"] |
Setup the Application Model Salaries as follows
Application Model : Salaries
Version Name: V1
For the Application Models Salaries, only the Application Model and the corresponding application model version have to be created. A Start table name is not required, because this Application Model is never used as start model. In addition, no data relation rules are needed because there are no tables related to the salaries table.
Attach the following Custom Parameters to the Application Model Salaries
| Name | value |
|---|---|
ApplicationModelGroup |
Salaries |
Creating the Library File
In this step, a script file is created that contains two main parts:
-
Start model and activation logic for installed applications.
Open XDM configuration → Files and click Create. Name the new file startModelAndActivationScript, choose Groovy as the file type, and save it.
In the Content area of the new file, insert the activation logic shown below. This script will be used in the start model script and activation script later on.
def getStartModel(def environment) {
    for (def entry in environment.installedApplications) {
        try {
            if (entry.applicationModel.startModelDynamic == environment.startModelDynamic) {
                println("StartModel: ${entry.applicationModel.displayName}");
                return entry
            }
        } catch (def error) {
            println("Fehler: ${error}")
        }
    }
    throw new Exception("No start model found for: ${environment.startModelDynamic}");
}

Boolean activateInstalledApplication(def environment, def installedApplication) {
    def startModel = getStartModel(environment);
    if (installedApplication.applicationModel.displayName == startModel.applicationModel.displayName) {
        println("Application Model: ${installedApplication.applicationModel.displayName} activated");
        return true;
    }
    try {
        for (def group in installedApplication.applicationModel.aGroup) {
            for (def selectedGroup in environment.aGroup) {
                println("${selectedGroup} == ${group} => ${(selectedGroup == group)}");
                if (selectedGroup == group) {
                    println("Application Model: ${installedApplication.applicationModel.displayName} activated");
                    return true;
                }
            }
        }
    } catch (def error) {
    };
    println("Application Model: ${installedApplication.applicationModel.displayName} deactivated");
    return false;
}
Creating Source Environment
This scenario requires one Source Environment and one Target Environment.
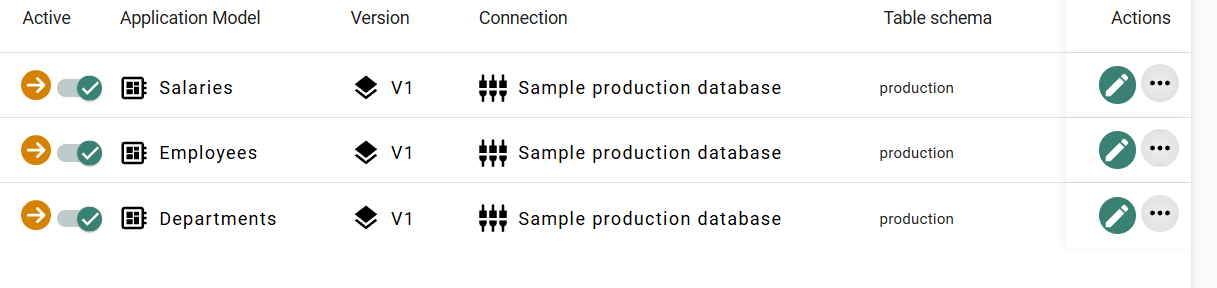
Create the Environment Production, this will be the source. In the Installed Application Panel add the related Application models to the Environment.
| Environment Name | Installed Application | Version | Connection | Table schema |
|---|---|---|---|---|
Production |
Employees , Departments, Salaries |
V1 |
Sample production database |
production |
This should be similar to this:
Attach the StartModelDynamic and ApplicationModelGroup Custom Parameter. They do not need any specific value at this point because their values will be set later at runtime.
Adding the Script File to the Environment
To make the functions from the script file available in the Environment, the file must be added to the Environment’s libraries:
-
In the Libraries field, make sure the script language is set to Groovy and add the startModelAndActivationScript file that was created earlier.
Configuring the Start Model Script
In the Start model section, set Start model selection type to Dynamic.
After selecting Dynamic, the input options for Start model changes and a new field start model script becomes available.
In the start model script field, enter the following code:
return getStartModel(environment)In this example, the getStartModel(environment) function from the startModelAndActivationScript file is used to resolve the installed application that
matches the dynamic start model selection.
The returned installed application is then used by XDM as the start model.
Configuring the Activation Script In the Environment
Because the file has been added to Libraries, the Environment activation script can call the function from the script file.
Set the activation script field of the Environment to the following code:
return activateInstalledApplication(environment, installedApplication)This call executes the activateInstalledApplication function from the StartModelAndActivationScript file for each installed application and uses the
result (true or false) to decide whether the installed application is active in the current execution.
Create the Target Environment Testing
Duplicate the Production Environment
Name it: Testing
Update the installed application:
| Environment Name | Application Model | Version | Connection | Table schema |
|---|---|---|---|---|
Testing |
Employees , Departments, Salaries |
V1 |
sample testing database as super user |
qa2 |
Creating the RLP Task Template
-
Name: Employees and Departments
-
Source Environment: Production
-
Target Environment: Testing
Next, attach our Custom Parameters:
-
At the top of the Task Template, go to Custom Parameter → Configure Custom Parameter.
-
Select the Custom Parameters StartModelDynamic, DepartmentNames, EmployeeNumber, and ApplicationModelGroup.
-
Click Apply.
-
Leave the parameters StartModelDynamic, DepartmentNames, and EmployeeNumber empty on the Task Template level.
-
For ApplicationModelGroup, fill in all values so that the Task Template defines the default set of Application Models.
Then configure the start conditions:
-
Open the Start Conditions tab.
-
For Kind of data selection, select Version, so the task takes the start condition which was specified in the Application Model version before.
Creating the First Data Shop for employees
Create a Data Shop Copy employees, which copies employees and their related data like the department.
In the Template settings:
-
In Executable type, select Task template.
-
In Task template, select the RLP Task Template that was created earlier (Employees and Departments).

In this case, the Data Shop should always copy employees and all related data. For this purpose, set the following parameter:
-
Go to the form parameters section and click the + button to add a new parameter.
-
Configure the form parameter as follows:
| Display Name | Description | Mapped Property | Possible Values | Hidden | Optional | Default Value |
|---|---|---|---|---|---|---|
StartModel |
optional |
StartModelDynamic |
leave empty |
active |
inactive |
employees |
EmployeeNumber |
optional |
EmployeeNumber |
leave empty |
inactive |
inactive |
empty |
| We set the StartModel parameter to hidden, and it’s Default value to employees, because the Data Shop itself specifies the start model in the background based on the selected Data Shop, without exposing any additional control to the user. |
You can now place your first Data Shop order by clicking Place order. In the EmployeeNumber input field, enter the numbers of the employees to include, separated by commas.
For example, the following values can be used: 10008,10009,10010,10011,10012.
Creating the Second Data Shop for departments
Create a Data Shop Copy departments which will copy departments with their related data like the employees.
In the Template settings section:
-
Set Executable type to Task template.
-
For Task template, select the same RLP Task Template as for the first Data Shop (Employees and Departments).
Next, configure the parameters for this Data Shop.
| Display Name | Description | Mapped Property | Possible Values | Hidden | Optional | Default Value |
|---|---|---|---|---|---|---|
StartModel |
optional |
StartModelDynamic |
leave empty |
active |
inactive |
departments |
Departments |
optional |
DepartmentNames |
leave empty |
inactive |
inactive |
leave empty |
ApplicationGroup |
optional |
ApplicationModelGroup |
leave empty |
inactive |
inactive |
departments |
Adding an Init Script
To provide a better user experience, an Init script can be used to pre-fill or adjust the form parameters when the Data Shop order form is opened.
-
In the Data Shop, locate the Init script property in the Scripts Panel.
-
Ensure that the Script language is set to Groovy.
-
Enter an init script that sets a reasonable default for the
ApplicationModelgroupparameter or adjusts the visibility of related fields. In the scripts we have to use the variable nameaGroupto work with the Custom Parameter ApplicationModelGroup
For example, the following code can be used:
if (dataShop.aGroup == null || !dataShop.aGroup.contains("Departments")) {

    if (dataShop.aGroup == null || dataShop.aGroup == "") {
        dataShop.aGroup = 'Departments'
    } else {
        dataShop.aGroup += ',Departments'
    }
}
for (entry in meta['aGroup'].options) {
    if (entry.displayName == 'Departments') {
        entry.enabled = false
    }
}
The init script is executed when the order form is initially displayed and can set values, enable or disable fields, or hide fields from the user interface.
Adding a Revalidation Script
A Revalidation script can be used to validate and normalize parameter values whenever the Data Shop order form is changed. This helps enforce dependencies between parameters and ensure that the Data Shop request always contains a consistent set of values.
-
In the Data Shop, locate the Revalidation script property in the Scripts Panel.
-
Ensure that the Script language is set to Groovy.
-
Enter a revalidation script that enforces the relationship between the values of the Custom Parameter
ApplicationModelGroup.
For example, the following code automatically blocks the place order button whenever the user only selects salaries
without employees because salaries needs employees and does not work without this Application Model.
if (dataShop.aGroup.contains('salaries') && !dataShop.aGroup.contains('employees')){
meta['aGroup'].error = "not possible"
}
You can now place your Data Shop order by clicking Place order. For example, you can copy all Employees from the Customer Service department. To do that activate, the Customer Service and the Employees checkboxes and click on place order.