Modification Sets and Modification Methods
Preparations for data masking
The schema qa1 has now been populated with an exact copy of the production
data. However, one requirement for the target schema qa3 is that personally identifiable
information (PII) must be masked for privacy and security reasons. XDM
can mask PII during a copy process, so that unmasked data never appears in any
of the target tables.
In this tutorial, the first name, last name and the date of birth of the entries in the employees table are masked by applying one of the pre-defined Modification Methods and one custom Modification Method to two columns of the table employees.
-
The pre-defined Modification Method First name is used to mask the first names of the employees (column first_name in the table employees).
-
The pre-defined Modification Method Last name is used to mask the last names of the employees (column last_name in the table employees).
-
A custom Modification Method is used to mask the date of birth of the employees (column birth_date in the table employees).
After creating the Modification Set you are going to use it in a
Compatibility Table Copy Task to populate the qa3 environment with masked production data.
Using Compatibility Table Copy Task
In this tutorial the main goal is to learn how to define and use Modification Methods and Modification Sets to mask personally identifiable information (PII), not to configure the fastest possible bulk copy mechanism.
For the target schema qa3, PII must be masked so that unmasked production data never appears in the target tables. XDM can apply modifications while it copies the data, so that only masked values are written to the target environment.
To keep the example as simple and portable as possible, the tutorial uses a Compatibility Table Copy Task.
A Compatibility Table Copy Task always uses SQL Data Transport.
Data is read from the source tables with SQL SELECT and written to the target tables with INSERT, UPDATE, DELETE and MERGE statements.
The extracted data is stored internally on the XDM server. It is not necessary to manage files on the database servers or to configure database‑specific unload/load utilities.
The same task definition works for many source and target combinations, even if the DBMS types are different. This makes it very easy to focus on the masking logic:
You define which columns (for example first_name, last_name, birth_date) should be masked and which Modification Methods should be used. XDM applies these methods to each row while it copies the data with SQL.
Import the pre-defined Modification Method
All pre-defined Modification Methods and other useful scripts are gathered in the user manual, refer to Configuration examples. Follow the link and download the example file of First name and Last name.
Click on the box icon in the top right corner, then click on the document icon with an arrow pointing to the right with the Text "Import" in the newly opened submenu to navigate to the Import page. With the Upload File button you can select the downloaded file from your disk. Probably you will find it in your Downloads folder under the name modification-method-first-name.yaml. If you want to have a look at the content of the file, you can click the Preview button and the content of the file will appear in the text field after a few seconds. Click the button Import. Click the button Close below the appearing panel named Import XDM Objects. With the Upload File button you can select the second downloaded file under the name modification-method-last-name.yaml. Click the button Import.
Click the button Close. Hereby the Import is completed.
Add the lookup tables
To use the pre-defined XDM Modification Methods, the lookup tables are needed as an XDM object. Therefore, the YAML import included the lookup tables as Mapping Table Container objects, too. Now the table data needs to be uploaded if this has not been done before.
-
Expand the menu by clicking on the Masking menu category in the left sidebar. Then click the menu item Mapping Table Containers.
-
Open the imported Mapping Table Container named
XDM Lookup Tableby clicking the button on the left side of XDM Lookup Table.
 -
If not already done, download the lookup tables from https://products.ubs-hainer.com/downloads/XDM3/Lookup-Tables-2.3.232/XDM3_Lookup_Tables.zip
-
Unzip the downloaded file. The ZIP file contains the file
h2_default.mv.db. -
Click on the Upload button and select the downloaded and unpacked
h2_default.mv.dband upload it. This may take a moment depending on the size of the file and the network speed.
Creating a custom Modification Method
We will create a custom Modification Method to mask the date of birth of the employees. The Modification Method has the following characteristics:
-
The year is not modified.
-
The month and day are set to 1.
In other words, the Modification Method replaces the actual date of birth with the 1st of January of the same year. The Modification Method only operates on the column it changes; it does not require any additional parameters.
To create a new custom Modification Method:
-
In the left sidebar, click the menu category Masking to expand the Masking menu and select the menu item Modification Methods. Then click the button + Create. Enter the following information:
Name
Change date to January 1stDescription
(Optional, use any description you like)
Modification type
Column
Under Modification code, you need to implement the custom Modification Method. You can do this using either Groovy or JavaScript. You will see three empty functions called
init,applyandclose. Modify theapplymethod. This can be done using Groovy or JavaScript, as follows:-
Groovy
-
JavaScript
def apply() {
  // Get the original value
  def originalDate = data[columnIndex]

  // Create a new calendar object with the original date
  def cal = Calendar.getInstance()
  cal.setTimeInMillis(originalDate.getTime())

  // Set to January 1st (month starts counting at 0)
  cal.set(Calendar.MONTH, 0)
  cal.set(Calendar.DAY_OF_MONTH, 1)

  // Convert back to a date object and replace column value
  def maskedDate = new Date(cal.getTimeInMillis())
  data[columnIndex] = maskedDate

  // Every Modification Method needs a return statement;
  // The current row will only be processed if true is returned.
  return true
}
function apply() { // Get the original value var originalDate = data[columnIndex]; // Create a new calendar object with the original date var cal = java.util.Calendar.getInstance(); cal.setTimeInMillis(originalDate.getTime()); // Set to January 1st (month starts counting at 0) cal.set(java.util.Calendar.MONTH, 0); cal.set(java.util.Calendar.DAY_OF_MONTH, 1); // Convert back to a date object and replace column value var maskedDate = new java.sql.Date(cal.getTimeInMillis()); data[columnIndex] = maskedDate; // Every Modification Method needs a return statement; // The current row will only be processed if true is returned. return true; } -
-
Click the button Save Changes.
Creating a Modification Set
Modification Methods represent the algorithms that change data during an XDM Task Execution, but they do not specify which tables and which columns are to be modified. XDM uses Modification Sets to specify how the Modification Methods are applied.
A Modification Set typically consists of multiple Modification Rules. Every Modification Rule specifies the column(s) on which it operates and a Modification Method which will be applied. For Modification Methods that require additional input parameters, the values are supplied by the rule which invokes the method.
Our custom Modification Method that changes date values to January 1st does not require any additional input parameters. However, the pre-defined Modification Method for last names requires the following parameters:
Parameter |
Description |
|
An input value of any type, based on which the masked name will be generated |
|
The desired country for the origin of the last name as a 2-letter abbreviation (for
example, |
| The pre-defined methods must be installed in XDM when using them in the tutorial. For more information, refer to the installation description. |
To create a Modification Set:
-
In the left sidebar, click the menu category Masking to expand the masking menu and select the menu item Modification Sets. Then click the button + Create. Enter the following information:
Name
Mask personal information in the employees table -
Click the button Create and edit.
-
Optional: Enter a description.
-
Click the button Save Changes.
Add the first Modification Rule to the set:
-
If the newly created Modification Set is not currently displayed, click the button
on the left side of it. -
Click the button + Create in the panel Modification Rules below.
-
You will see the panel New Modification Rule opened and the tab General Settings. Enter the following information:
Active
(check the box)
Scope
Select Source from the drop-down list
Schema pattern
%Name pattern
employeesColumn pattern
first_nameModification propagation
Leave unchecked
Automatic Datatype Conversion Per Row
Leave unchecked
Modification Method
Select First name from the drop-down list
-
In the bottom expandable panel Parameters, you will see an entry for each of the three parameters that this method requires.
-
Enter the following information:
Country parameter settings
Value source
Constant
Country
The possible values to choose from are: England (
EN), Germany (DE), France (FR), Italy (IT) and Netherlands (NL).Enter
ENfor England.Seed parameter settings
Value source
Column
Seed
first_name
Sex parameter settings
Value source
Column
Sex
gender
-
Click the button Save Changes.
Add the second Modification Rule to the set:
-
Use the breadcrumbs in the head bar to navigate back to Modification Rules.
-
or navigate to the menu item Modification Sets under the menu category Masking. Click the button
on the left side of
the recently created Modification Set name to open the Modification Set.-
Click the button + Create in the panel Modification Rules below.
-
You will see the panel New Modification Rule opened and the tab General Settings. Enter the following information:
Active
(check the box)
Scope
Select Source from the drop-down list
Schema pattern
%Name pattern
employeesColumn pattern
last_nameModification propagation
Leave unchecked
Automatic Datatype Conversion Per Row
Leave unchecked
Modification Method
Select Last name from the drop-down list
-
After selecting the Modification Method Last name from the drop-down list, the bottom part of the panel displays the parameters for this method. Enter the following information:
Country parameter settings
Value source
Constant
Country
The possible values to choose from are: England (
EN), Germany (DE), France (FR), Italy (IT) and Netherlands (NL).Enter
ENfor England.Seed parameter settings
Value source
Column
Seed
last_name
-
Click the button Save Changes.
-
The predefined Modification Method obtains its values from a lookup table.
It is known that at least one name in the lookup table is too long for the target table
column last_name. Whilst it is possible to avoid this problem by altering the
value in the lookup table or changing the Modification Method, these approaches might
not always be practical. For instance, users might not have the authority to alter
either the table or the method. This would mean making a request to have one of them
altered, which might cause unnecessary delays. XDM provides a mechanism for dealing
with such situations in the form of an
adaption script.
Go back to the Modification Rule that was just created by clicking the leftmost button of the
row ![]() . At the top of the panel
there is a second tab called Rule scripts. Click this tab to access the script panel.
. At the top of the panel
there is a second tab called Rule scripts. Click this tab to access the script panel.
At the top of the panel a Condition script can be specified. This script determines
whether the Modification Method should be applied in the current situation. By default,
it simply returns true. This script does not need to be altered.
Just below an Adaption script can be added to the rule. This contains the functions
convertTo() and convertFrom(). The former is applied to column values before they
are modified, whilst the latter is applied after the column value has been modified.
By default, both functions are commented out.
Add an adaption script to the recently created rule handling the last names:
-
Click the button Edit at the top right of the panel. The scripts are now editable.
-
Remove the comment markers
/*and*/before and after the adaption script functionconvertFrom()respectively. -
Modify the code as follows:
-
Groovy
-
JavaScript
void convertFrom() {
 if (data[columnIndex].size() > 16) {
    data[columnIndex] = data[columnIndex][0..15]
  }
}
function convertFrom() { if (data[columnIndex].length > 16) { data[columnIndex] = data[columnIndex].substr(0, 16); } } -
-
Click the button Save Changes
Add the third Modification Rule to the set:
-
Click the button + Create again in the panel Modification Rules below.
-
You will see the panel New Modification Rule opened and the tab General Settings. Enter the following information:
Active
(check the box)
Scope
Select Source from the drop-down list
Schema pattern
%Name pattern
employeesColumn pattern
birth_dateModification propagation
Leave unchecked
Automatic Datatype Conversion Per Row
Leave unchecked
Modification Method
Select Change date to January 1st from the drop-down list
-
Click the button Save Changes.
-
The Modification Rule is now inserted into the list of rules that belong to this Modification Set and will appear in the bottom panel. This method does not require any parameters.
At this point, the Modification Set looks like this:
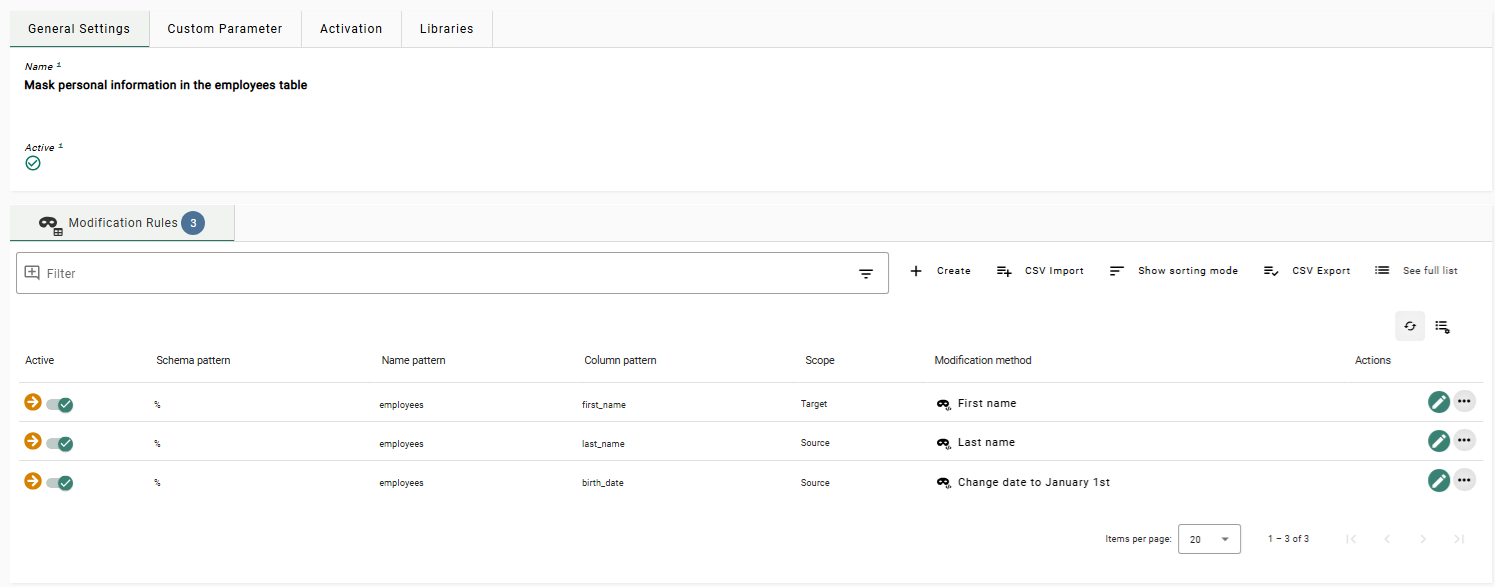
The Modification Set is now ready to use.
Providing data for the schema qa3
We will now populate the qa3 schema with masked PII data using a new Compatibility Table Copy Task.
For this, we will create a new Compatibility Table Copy Task Template, in which we will utilize
our new Modification Set.
The Task Template will specify the source connection and the source schema so that all tables in that schema will be copied.
It will also specify the Modification Set that we will use for our Compatibility Table Copy Task.
Creating the second Table Copy Task Template
-
Click on the menu item Task Templates under the menu category Tasks and click on the tab Table Copy. Navigate to the list entry Compatibility Table Copy Task Templates and click the button
on the left side of it to open the list.In the next panel click the button + Create and enter the following information:
Name
Copy modified production schema -
Click the button Create and edit.
-
In the tab General Settings under the expandable panel Source/Target Connections, click Source connection and select Sample production database from the drop-down box.
Leave the target connection unspecified. The target connection will be chosen when the actual task is created. -
Click the button Save Changes.
-
In the bottom expandable panel Rules, under the tab Selection Rules, click the button + Create.
-
Under Schema pattern, enter
production. -
Click the button Save Changes.
Instead of entering the schema name explicitly, it is also possible to select it from the list of all existing schemas. To do so, click the button Pick and select the desired schema in the list on the left. The schema name will be copied into the field Schema pattern. -
Click the button Edit for the Task Template.
-
In the tab Modification in the upper panel, search for the name of your Modification Set in the search bar and select Mask personal information in the employees table to add the Modification Set to the Task Template.
-
Click the button Save Changes.
After that the creation of the Task Template is finished. It should look like the following:

Creating the Compatibility Table Copy Task
The Compatibility Table Copy Task is based on the Compatibility Table Copy Task Template that we just created.
-
In the expandable panel Tasks in the bottom click the button + Create. Enter the following information:
Target connection
Select Sample testing database as super user from the drop-down list
Name
Copy masked production schema to qa3 -
Click the button Create and edit.
-
Optional: In the field Description under the tab Task Information, enter a description for the new task.
-
Click the button Save Changes.
-
In the bottom expandable panel Rules select the tab Mapping Rules and click the button + Create.
-
Enter the following information:
Description
(Optional, may be left empty)
Active
Check the box
Field selection mode
Select Simple from the drop-down list
Object type
Select ANY from the drop-down list
Field type
Select SCHEMA from the drop-down list
Source selection pattern
%Target value mode
Select Pattern from the drop-down list
Target value
qa3 -
Click the button Save Changes.
The Compatibility Table Copy Task has been defined. It will use the Modification Set defined on the template.
Executing the Compatibility Table Copy Task
To execute your Compatibility Table Copy Task:
-
In the left sidebar, click the menu category Tasks to expand the tasks menu and select the menu item Task Templates.
-
Under the tab Table Copy click the button
on the left side of Compatibility Table Copy Task Templates to expand the list. Click the button next to Copy modified
production schema. Locate the task Copy production schema to qa3 in the tab Tasks and
click the button on the left side of the Task Templates name. -
In the right sidebar, click the button Execute. A dialog window opens. Leave Interrupt execution unchecked and click the button Execute and view. This will schedule the task for immediate execution and switch the main view to the Executed Tasks.
-
The task runs asynchronously in the background. Every five seconds, the status is refreshed automatically. Within a few minutes the task should finish.
-
In the top left corner, the task status should show COMPLETE.
You now have a complete masked copy of all the data from the production
tables in the database testing under the schema name qa3.
Previous section: Native Table Copy Tasks | Next section: Application Models and Environments