Test Data Finder
Overview
XDM’s Test Data Finder allows users to search for application-specific Attributes and retrieve test data that meets their criteria. It helps identify more precise test cases for edge scenarios while also offering a broader range of variations for standard test definitions.
For more information, visit: Test Data Finder and Classification Terms.
IMPORTANT: To execute a Data Indexing Task, it is necessary to have a running neo4j container, which must not be commented out in the docker-compose.yml file.
Related Object References
The following object references are used within the Test Data Finder:
The following references provide additional details on the components and configurations relevant to the Test Data Finder.
Creating Classification Terms
Classification Terms define the Attributes used to categorize test data. Follow these steps to create them:
-
Go to Data Subsets in the menu and select Classification Terms. Click + Create to add a new Classification Term.
-
In the New Classification Term panel, enter the following details:
Field
Value
Name
EmployeeColumns
Employee ID -
Click Save Changes.
-
Repeat the process to create another Classification Term:
Field
Value
Name
DepartmentColumns
Department -
Click Save Changes again to finalize.
Creating Classification Term Usage, Attributes and Classification Term Relation
-
In the left sidebar, click the menu category Data Subsets to expand the data subsets menu and select the menu item Application Models.
-
Open the Application Model by clicking the button
 on the left side of the
 HR Department. -
Next, open
V1by clicking the button on the left side from the Versions list at the bottom of the page. -
Open the panel Test Data Classification at the bottom of the page.
-
Then select the tab Classification Term Usage and click the button + Create. Enter the following information:
Field
Value
Classification Term
DepartmentName pattern
departmentsColumns
dept_noScript language
GroovyFormat Script
return 'D-' + String.format("%s", data['dept_no']) -
Click the button Save Changes.
-
In the panel Test Data Classification, select the tab Attributes from the panel Test Data Classification and click the button + Create. Enter the following information:
Field
Value
Name
DepartmentClassification Term
DepartmentName pattern
departmentsColumn expression
dept_nameEnumerate values
active -
Click the button Save Changes.
Now we need to repeat the same process for the HR Employee Application Model
-
In the left sidebar, click the menu category Data Subsets to expand the data subsets menu and select the menu item Application Models.
-
Open the Application Model by clicking the button
on the left side of the HR Employee. -
Next, open
V1by clicking the button on the left side from the Versions list at the bottom of the page. -
Open the panel Test Data Classification at the bottom of the page.
-
Then select the tab Classification Term Usage and click the button + Create. Enter the following information:
Field
Value
Classification Term
EmployeeName pattern
employeesColumns
emp_noScript language
GroovyFormat Script
return 'E-' + String.format('%s', data['emp_no']) -
Click the button Save Changes.
-
In the panel Test Data Classification, select the tab Attributes and click the button + Create. Enter the following information:
Field
Value
Name
SalaryClassification Term
EmployeeName pattern
salariesColumn expression
salaryEnumerate values
inactive -
Click the button Save Changes.
-
For each of the following Attributes, repeat the creation process as described above with the following values:
Field
Value
Name
GenderClassification Term
EmployeeName pattern
employeesColumn expression
genderEnumerate values
activeField
Value
Name
TitleClassification Term
EmployeeName pattern
titlesColumn expression
titleEnumerate values
activeField
Value
Name
Hire DateClassification Term
EmployeeName pattern
employeesColumn expression
hire_dateEnumerate values
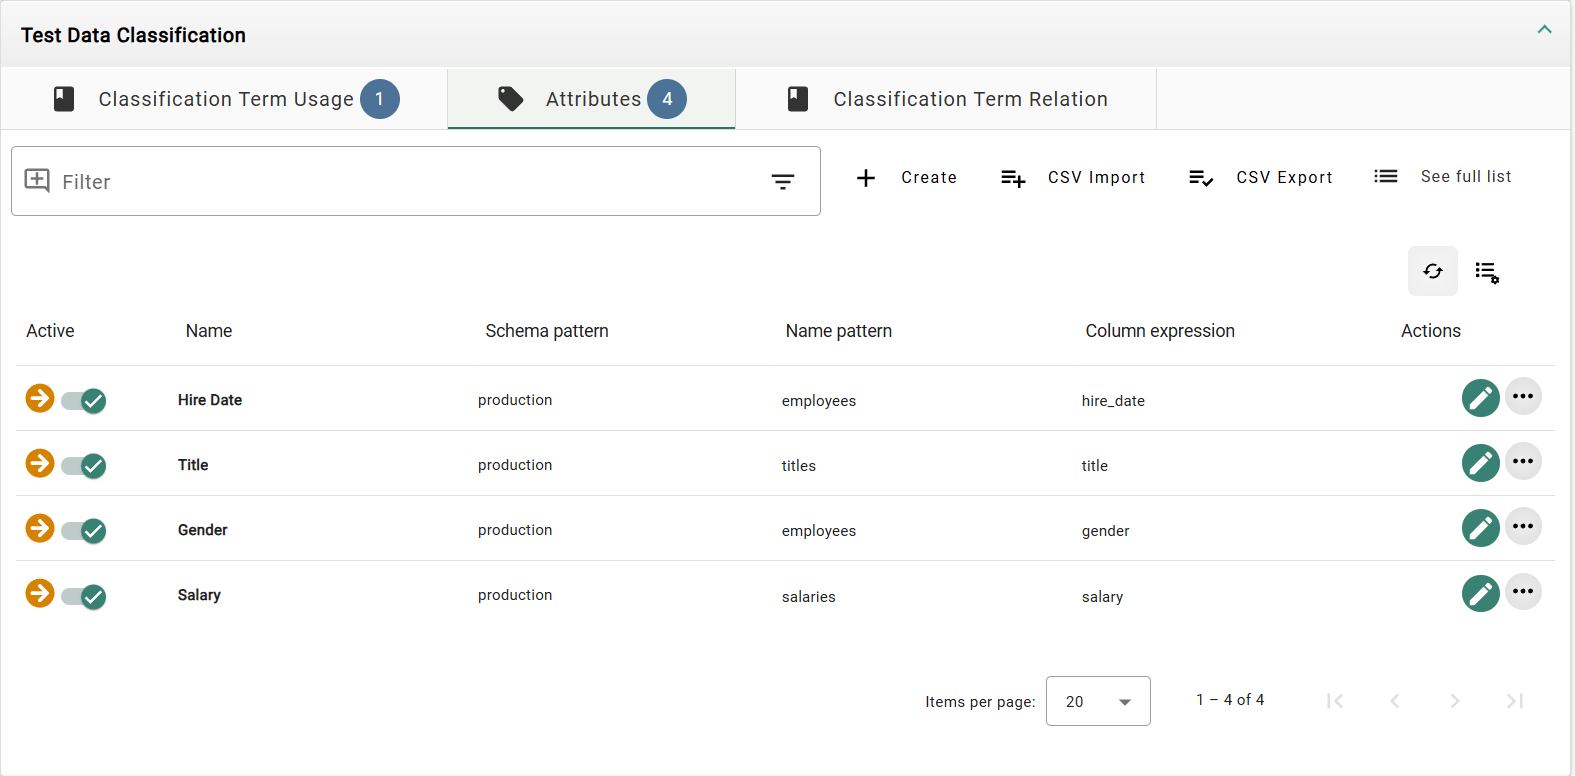
inactiveIt should now look like this in the attribute’s list:
-
Then select the tab Classification Term Relation and click the button + Create. Enter the following information:
Field
Value
Name
Employee works in DepartmentTable
dept_empFrom Application Model
HR EmployeeFrom Term
EmployeeFrom Columns
emp_noTo Application Model
HR DepartmentTo Term
DepartmentTo Columns
dept_noColumn values identical to term values
inactive -
Click the button Save Changes.
Now we need to repeat the last step for the Application Model HR Department.
-
In the left sidebar, click the menu category Data Subsets to expand the data subsets and select Application Models.
-
Open the Application Model by clicking the button
on the left side of the HR Department. -
Next, open
V1by clicking the button on the left side from the Versions list at the bottom of the page. -
Open the panel Test Data Classification at the bottom of the page.
-
Then select the tab Classification Term Relation and click the button + Create. Enter the following information:
Field
Value
Name
Employee is head of DepartmentTable
dept_managerFrom Application Model
HR EmployeeFrom Term
EmployeeFrom Columns
emp_noTo Application Model
HR DepartmentTo Term
DepartmentTo Columns
dept_noColumn values identical to term values
active -
Click the button Save Changes.
The Application Models are now ready, so we can go to the next step.
Creating the Data Indexing Task Template
-
In the left sidebar, click the menu category Tasks to expand the data subsets menu and select Task Templates.
-
In the tab Analyze, click the button
on the left side of Data Indexing Task Template to expand the list. Initially, the list may be empty. -
Click the button + Create. A panel titled Create Data Indexing Task Template opens. Enter the following information:
Field
Value
Name
Scan production employees -
Click the button Create and edit.
-
Enter a description:
Field
Value
Description
Scans the production tables and builds an index for the specified Classification Terms and its Attributes -
Next, select the Environment:
HR Production. -
In the top panel, select the tab Other Options and select Log level:
Trace. -
Click the button Save Changes.
-
Open the Tasks panel at the bottom of the page and click the button + Create. Enter the following information:
Field
Value
Name
Scan employees -
Click the button Create.
-
While in your Task Template, locate the task in the bottom panel under the tab Tasks and click the execute button (
 ) on the right.
 -
A dialog window opens. Leave Interrupt execution unchecked and click the button Execute and view. This will schedule the task for immediate execution and switch the main view of Executed tasks.
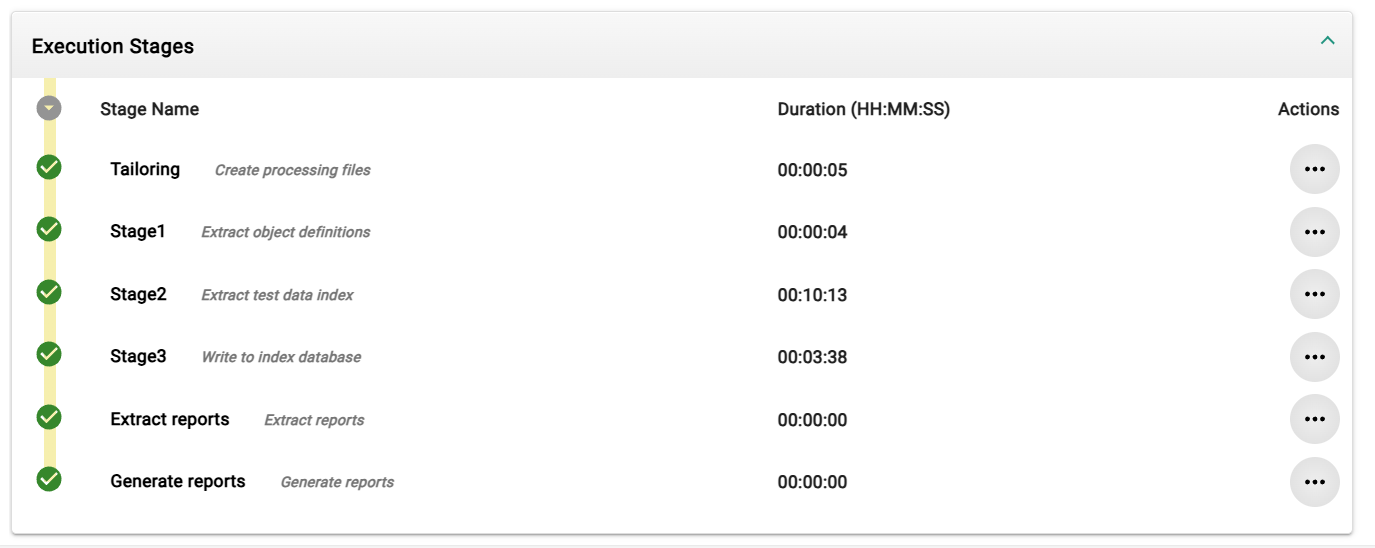
The execution process should look like this for Scan production employees:
Configure Data Shop for the Test Data Finder
-
In the left sidebar, click the menu category Tasks to expand the task’s menu and select the menu item Data Shops.
-
Open the Data Shop by clicking the button
on the left side of the Copy employee by id. -
Click the button Edit. Then in the top panel, select the tab Test Data Finder and enter the following information:
Field
Value
Environment
HR ProductionClassification Term
Employee -
Click the button Save Changes.
Use of the Test Data Finder
-
In the left sidebar, click the menu category Tasks to expand the task’s menu and select the menu item Data Shops.
-
Locate the desired Data Shop and click Place Order (
 ).
).
Now, an Employee ID field appears with the Test Data Finder below.
Selecting Employee Attributes
-
Click + to open the Filter Attributes dialog and choose
Employeefrom Attributes of Classification Term. -
Click Next and select the following Attributes:
-
Hire Date -
Title -
Gender -
Salary
-
-
Click Next, review the summary, and click Apply.
Selecting Department Attributes
-
Click + again and select
Departmentfrom Attributes of Classification Term. -
Click Next and choose the relation path:
Employee works in Department. -
Click Next and select
Departmentunder Attributes. -
Click Next, review the summary (Going over relation Employee works in Department), and click Apply.
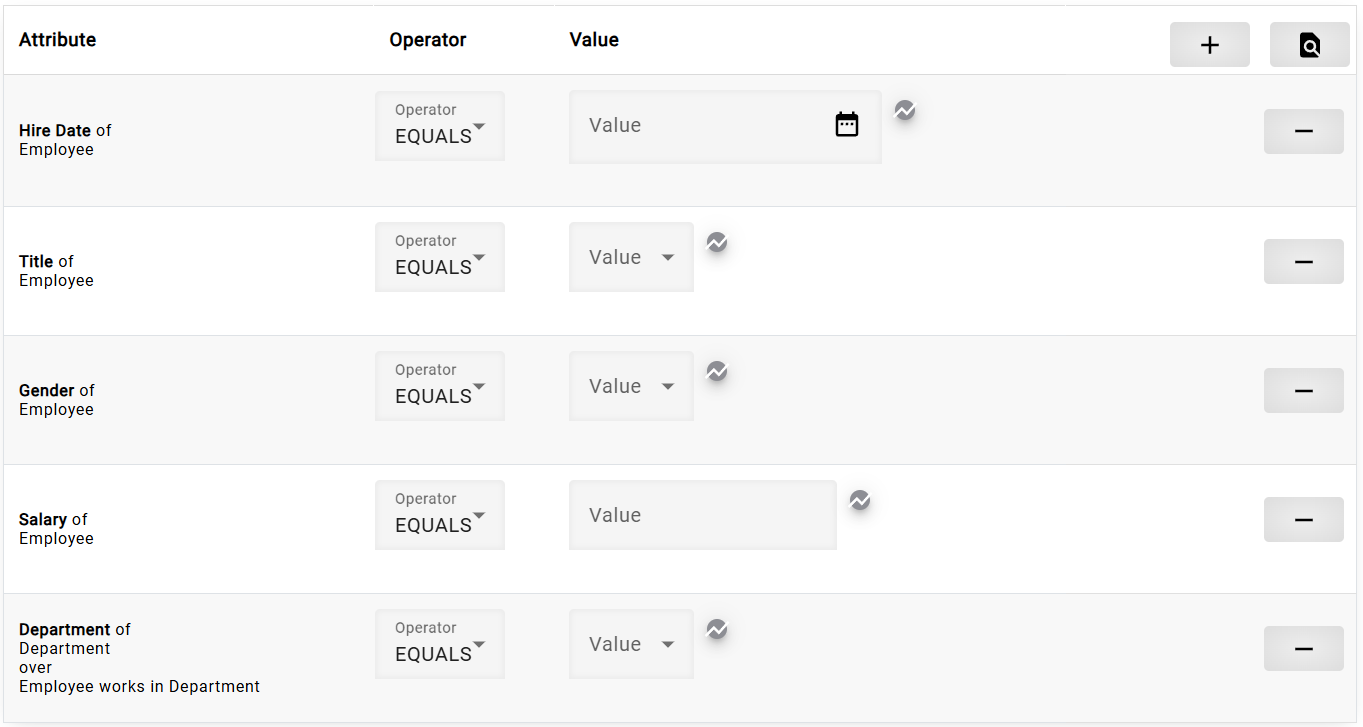
Now the Configure attribute filters list should appear as follows:
Configuring Filters
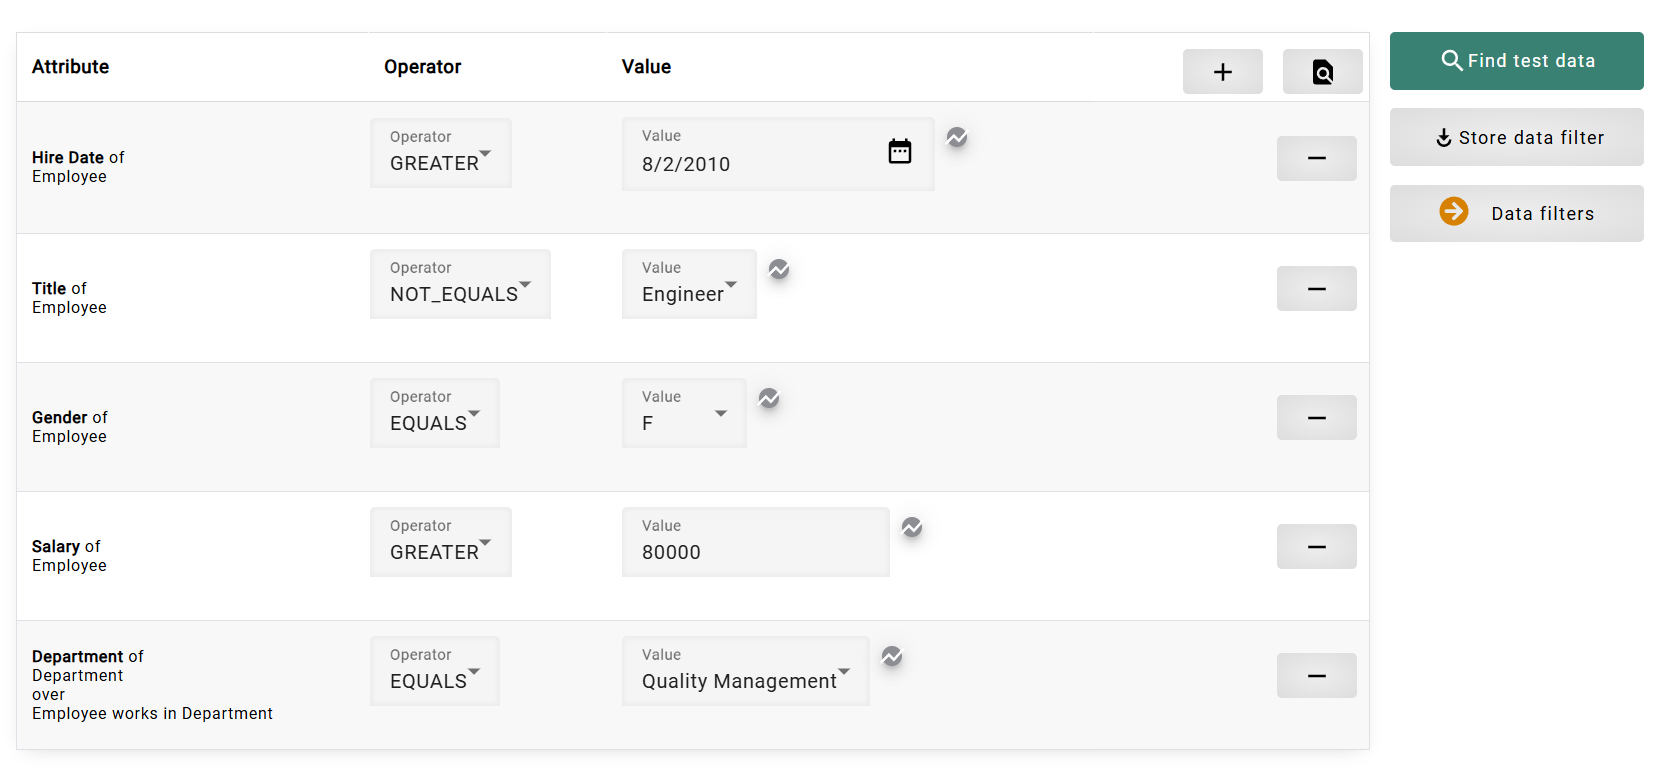
Fill in the filters with the following values:
Attribute |
Operator |
Value |
Hire Date of Employee |
|
|
Title of Employee |
|
|
Gender of Employee |
|
|
Salary of Employee |
|
|
Department of Department over Employee works in Department |
|
|
-
Click the button Find test data to execute the filter and retrieve matching test data.
Store Data Filter
-
Click the button Store data filter to save the configured attribute filters for future use.
-
A panel titled Create Attribute Comparison Filter will open. Enter the following details:
Field
Value
Name
Employees work in Quality Management -
Click the button Create to save the filter.
Once saved, this filter can be accessed and applied later to streamline the test data selection process.
Load Data Filter
-
Click the (
 ) button to access previously stored attribute filters.
 -
A list of saved filters will be displayed. Select the desired filter to automatically reload its configuration.
By using the Store Data Filter functionality, users can save time by reusing predefined filter configurations. The Load Data Filter feature allows users to quickly retrieve and apply previously saved filters, ensuring consistency in test data selection.
Viewing Results
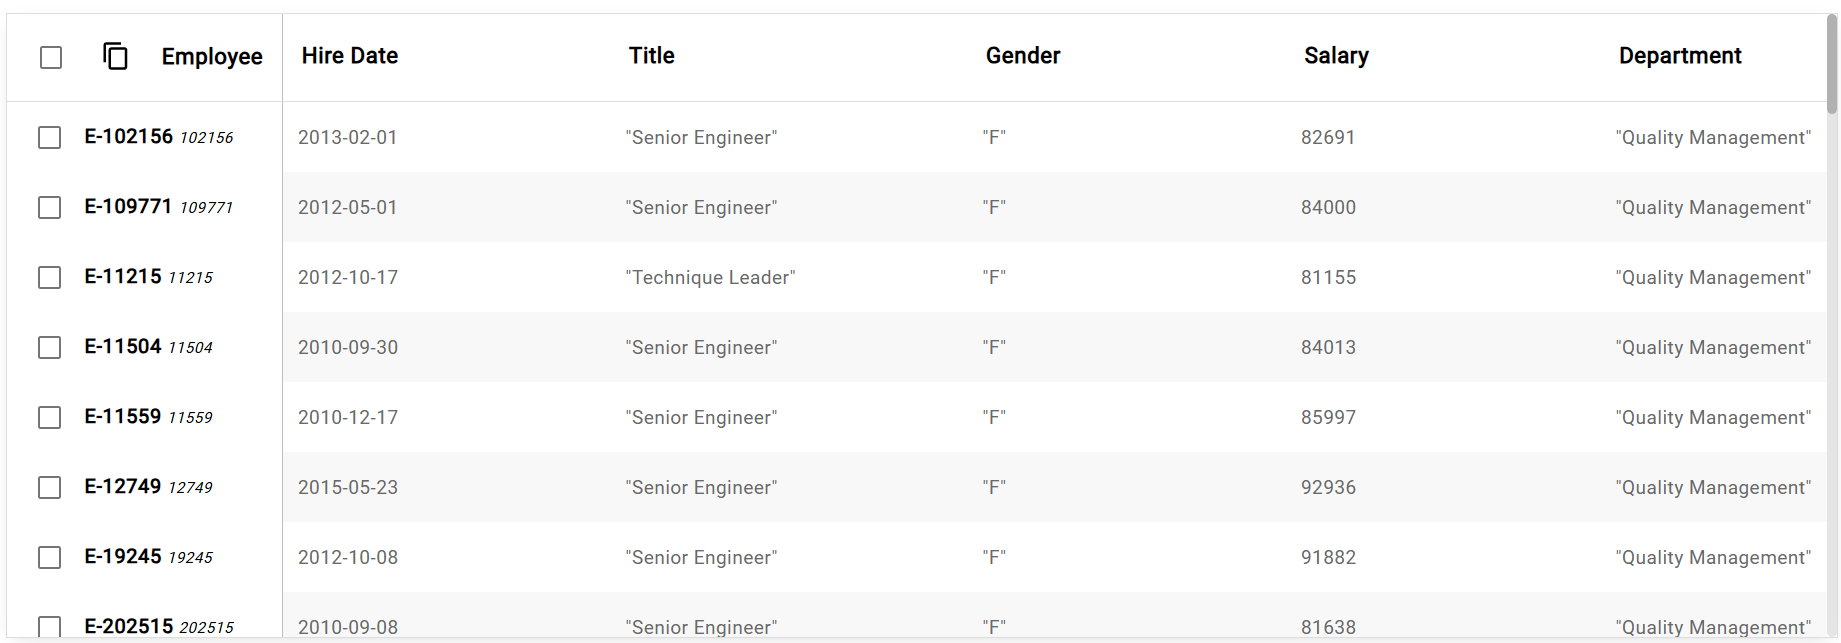
A Test data matching the filter list appears with the following data:
-
Click (
 ) next to the Employee title to copy the selected Employee IDs.
 -
Paste the copied data into the Employee ID field at the top.
-
Click (
) to process the Data Shop request.
Once the Place Order button is clicked, the Data Shop runs the task in the background using the Employee IDs copied from the filtered list.
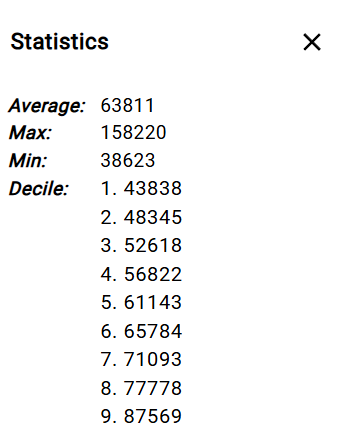
Viewing Salary Statistics
-
Click the Statistics button (
 ) in the row "Salary of Employee" to open the statistics window.
 -
The statistics window provides key salary, insights and the decile distribution shows salary ranges across percentiles:
-
Use this data to refine attribute filters based on salary distributions and improve test data selection.
Previous section: Configuration of a Complex Data Shop | Next section: Data Generation