Installation of a file bridge server
Installation under Linux / UNIX
Prerequisites
You can install the UBS File Bridge server on a Linux / UNIX or Windows server. It is recommended to install the UBS File Bridge server on one of the following Linux distributions:
-
Red Hat Enterprise Linux 7.x or 8.x or compatible (e.g. CentOS 7.x or 8.x)
-
Debian Linux 10
Installation with Docker
The UBS File Bridge server is available as a Docker image that can be installed and executed using a docker-compose.yml file.
Docker CE (Community Edition) is a free and open source containerization platform.
Docker EE (Enterprise Edition) is an integrated version of Docker CE with certification and support by Docker Inc.
The following applications must be installed on your system:
-
Docker CE or Docker EE version >= 1.13.1
-
Docker Compose version >= 1.17
Further information about the installation and usage of Docker and Docker Compose can be found under the following links:
For more information on how to use the command docker load see:
Installation
In order to have Docker automatically download all required images, you must log in to the UBS Hainer Docker repository. To do so, please follow the instructions in the XDM installation guide.
The following sample docker compose file can be used to start the UBS File Bridge server:
version: '3.3'

services:
  jdbcserver:
    image: docker.ubs-hainer.com/jdbcserver
    environment:
      - TZ=Europe/Berlin
      - ADMIN_USER=admin
      - ADMIN_PASSWORD=default
      - SERVER_PORT=5000
      - LOG_LEVEL=INFO
      - CERTIFICATE="${MYCERTIFICATEENVVAR}"
      - PRIVATEKEY="${MYPRIVATEKEYENVVAR}"
    ports:
      - 5000:5000
    volumes:
      - /opt/csvExternal/:/jdbcserver/data
- ./directory:/jdbcserver/directory- ADMIN_USER
-
In this line, specify the name of the File Bridge superuser.
- ADMIN_PASSWORD
-
In this line, specify the password of the File Bridge superuser.
- LOG_LEVEL
-
The following types of messages will be issues by the server, depending on the setting of the parameter
LOG_LEVEL:-
ERROR: Only error messages -
WARNING: Error and warning messages -
INFO: Error messages, warning messages, and informational messages (this is the default) -
VERBOSE: LikeINFO, but show additional detail messages -
DEBUG: LikeVERBOSE, but show additional diagnostic messages
-
- CERTIFICATE and PRIVATEKEY
-
By default, the connection between the client and the FileBridge server is not encrypted. All data transmitted over the network are not encrypted. To enable encryption, use the CERTIFICATE and PRIVATEKEY properties to configure an SSL/TLS certificate. These properties must contain the certificate and the corresponding private key, respectively. Ensure that your certificate and private key are in X.509 structure. If you prefer them as local file, ensure they are also in PEM format.
- 5000:5000
-
You can choose the TCP port under which the File Bridge server will be accessible by changing the mapping in the
portssection. For example, in order to use port 7000 instead of 5000, modify the section as follows:ports: - 7000:5000
Starting and stopping the File Bridge Server
To start the File Bridge Server, enter the following command:
docker compose up -dThe parameter -d causes the File Bridge Server to start in the background so that it will keep running when you exit then shell.
You can connect to this server using the File Bridge JDBC driver client JAR.
If the client application is running on the same system as the server, use the URL jdbc:ubs://localhost:5000.
Otherwise, replace localhost with the host name or IP address of the server in the JDBC URL.
The username and password of the admin user are specified in the docker compose file.
This example uses username admin and password default.
You can mount the directories that contain the CSV files to be accessed by the server in the volume section of the docker compose file.
A file on the host machine.
In this example, all CSV files that are located in the directory /opt/csvExternal of the host operating system show up in the directory /jdbcserver/data of the guest image.
The UBS File Bridge server maintains information about user objects in the directory
/jdbcserver/directory.
It is recommended that this directory is made persistent so that its contents are retained when the Docker container is removed.
In this example, a local directory called directory is used by specifying its relative path name.
To stop the File Bridge Server, enter the following command:
docker compose downAutomatically starting the File Bridge Server after reboot
In order to automatically start the File Bridge Server when the system is rebooted, modify the file docker-compose.yml as follows:
version: '3.3'

services:
  jdbcserver:
    image: docker.ubs-hainer.com/jdbcserver
    restart: always
    environment:
      - TZ=Europe/Berlin
      - ADMIN_USER=admin
      - ADMIN_PASSWORD=default
      - SERVER_PORT=5000
    ports:
      - 5000:5000
    volumes:
        - /opt/csvExternal/:/jdbcserver/data
- ./directory:/jdbcserver/directory- restart
-
If you specify
restart: always, the File Bridge Server is started automatically after every reboot. If it is stopped by an explicitdocker compose downcommand, it remains shut down for the session unless it is explicitly restarted, but it will start automatically after a reboot.If you specify
restart: unless-stoppedinstead, the File Bridge Server is also started automatically after every reboot. If it is stopped by an explicitdocker compose downcommand, it remains shut down for the session unless it is explicitly restarted, and it will not start automatically after a reboot.
Installation without Docker
The software package provided by UBS Hainer GmbH contains the product documentation and a File Bridge Server jar file.
This server jar file has the naming convention
filebridge-server-XXX.jar, where XXX is a version number string.
It is part of the XDM installation ZIP file.
In the following examples, it is assumed that the File Bridge Server is to be installed under /opt/filebridge.
If you are using a different installation directory, please change the commands accordingly.
In addition, it is assumed that the path to the Java executable is in the system path.
If this is not the case, please specify the full path to the Java executable wherever the java command is used.
Installation
To install the File Bridge Server, create the directory where the File Bridge Server should be installed, then copy the file filebridge-server-XXX.jar into this directory using the new name filebridge-server.jar by entering the following commands:
mkdir -p /opt/filebridge
cp filebridge-server-XXX.jar /opt/filebridge/filebridge-server.jar
SSL/TLS Encrypting
By default, the connection between the client and the FileBridge server is not encrypted. All data transmitted over the network are not encrypted. To activate SSL/TLS encryption, a certificate and a private key must be available. Ensure that your certificate and private key are in X.509 structure. If you prefer them as local file, ensure they are also in PEM format.
Starting and stopping the File Bridge Server
When starting the File Bridge Server, the directory from which the process is started will become the working directory.
The File Bridge Server will create (if it does not exist) and access a directory inside the working directory to store meta information about all existing tablespaces and tables.
The name of this directory is directory.
The user ID that is used to start the File Bridge Server must have write access to the current working directory, otherwise errors will occur when attempting to create tablespaces or tables through a client application.
Starting and stopping the File Bridge Server as a foreground process
To start the File Bridge Server as a foreground process, enter the following commands:
cd /opt/filebridge
java -jar filebridge-server.jar [OPTIONS]
Starting and stopping the File Bridge Server as a background process
To start the File Bridge Server as a background process, enter the following command:
cd /opt/filebridge
java -jar filebridge-server.jar [OPTIONS] &
To stop the File Bridge Server when started as a background process:
-
Enter the following command to find out the process ID of the File Bridge Server:
ps a | grep java | grep filebridgeThe system reply begins with the numeric process ID. For example, in the following reply, the process ID is 3855:
3855 pts/2 Sl 0:00 java -jar filebridge-server.jar -
Send an interrupt signal to the File Bridge Server by entering the following command (replace
XXXXwith the process ID identified in the previous step):kill -SIGINT XXXX
Automatically starting the File Bridge Server after reboot
You can create a systemd service in order to automatically start the File Bridge Server when the system reboots.
In the directory /usr/lib/systemd/system, create a file filebridge.service with the following content:
[Unit]
Description=File Bridge service
After=network.target
StartLimitIntervalSec=0

[Service]
Type=simple
Restart=always
RestartSec=1
WorkingDirectory=/opt/filebridge
ExecStart=java -jar /opt/filebridge/filebridge-server.jar [OPTIONS]
User=root
SuccessExitStatus=143

[Install]
WantedBy=multi-user.target- WorkingDirectory
-
This should refer to the directory in which the subdirectory for meta information should be created (if it does not exist) and accessed.
- ExecStart
-
This must contain the full path to the File Bridge Server
.jarfile. - User
-
This specifies under which user ID the File Bridge server will run. This user ID must have full access to the directory specified as
WorkingDirectory. In addition, this user ID will be used to access CSV files that are associated with tablespaces.
After creating the file filebridge.service, you can control the File Bridge Server using the systemctl command.
To start the File Bridge Server, enter the following command:
systemctl start filebridgeTo stop the File Bridge Server, enter the following command:
systemctl stop filebridgeTo see the current status of the File Bridge Server, enter the following command:
systemctl status filebridgeTo start the File Bridge Server automatically when the system is booted, enter the following command:
systemctl enable filebridgeTo prevent the File Bridge Server from running automatically when the system is booted, enter the following command:
systemctl disable filebridgeCommand line options
The following command line options can be used when starting the File Bridge server. Unless states otherwise, every option requires a value.
| Long name | Short name | Description |
|---|---|---|
|
|
Specifies the name of the superuser account. |
|
|
Specifies the password for the superuser account. |
|
|
Specifies the TCP port under which the server will be accessible. The default value is 5000. |
|
|
Specifies the verbosity of log messages. Possible values are: ERROR: Only error messages are printed. WARNING: Error messages and warning messages are printed. INFO: Error messages, warning messages and informational messages are printed. VERBOSE: Like INFO, but additional messages are printed to provide more details about events. DEBUG: Like VERBOSE, but additional messages are printed that can be used for problem determination. Note: This log level will cause the File Bridge server to produce a very large number of messages and is not suitable for normal use. The default value is INFO. |
|
|
Specifies the time zone that should be used in log messages. The default value is the system time zone. |
|
|
Specifies the maximum number of network errors that may occur while waiting for incoming connections. When this threshold is reached, the server shuts down automatically. A successful connection resets the counter. The default value is 10. |
|
|
When five consecutive network errors occur while the File Bridge server waits for incoming connections, the value of this option determines the delay (in seconds) before another attempt is made to wait for incoming connections. The default value is 30. |
|
|
Prints usage notes and exits the program. This option does not require a value. If this option is specified, all other options are ignored. |
|
|
Set a certificate for the SSL/TLS encryption. Make sure your certificate is in |
|
|
Set a private key for the SSL/TLS encryption. Make sure your private key is in |
|
|
Set the certificate for the SSL/TLS encryption by a local file. Make sure your certificate is |
|
|
Set the private key for the SSL/TLS encryption by a local file. Make sure your private key is |
If an option requires a value, that value must be specified after the option name. Each option has a long name that starts with two hyphens, and a short name that starts with a single hyphen.
When using long option names, the actual value for each option must be separated from the option name using either a space or an equals sign.
When using short option names, the actual value for each option can either be written directly after the option name without any separators, or it can be separated from the option name using a space (not an equals sign).
For example, the following specifications are equivalent and set the superuser name to ADMIN:
--user=ADMIN
--user ADMIN
-u ADMIN
-uADMIN
To stop the File Bridge Server when started as a foreground process, press CTRL+C in the shell where it is running.
Installation under Windows
Prerequisites
You can install the UBS File Bridge server under Microsoft Windows.
In the following examples, it is assumed that the File Bridge Server is installed under C:\Program Files\filebridge.
If you are using a different installation directory, please change the commands accordingly.
In addition, it is assumed that the path to the Java executable is in the system path.
If this is not the case, please specify the full path to the Java executable wherever the java.exe command is used.
Installation
The software package provided by UBS Hainer GmbH contains the product documentation and a File Bridge Server jar file.
This server jar file has the naming convention
filebridge-server-XXX.jar, where XXX is a version number string.
It is part of the XDM installation ZIP file.
Create the directory C:\Program Files\filebridge and copy the file filebridge-server-XXX.jar
into this directory.
Rename the file to filebridge-serve.jar.
Starting and stopping the File Bridge Server
When starting the File Bridge Server, the directory from which the process is started will become the working directory.
The File Bridge Server will create (if it does not exist) and access a directory inside the working directory to store meta information about all existing tablespaces and tables.
The name of this directory is directory.
The user ID that is used to start the File Bridge Server must have write access to the current working directory, otherwise errors will occur when attempting to create tablespaces or tables through a client application.
Starting and stopping the File Bridge Server as a foreground process
To start the File Bridge Server as a foreground process, open a command line window and enter the following commands:
cd "C:\Program Files\filebridge"
java -jar filebridge-server.jar
To stop the File Bridge Server when started as a foreground process, press CTRL+C in the command line window where it is running.
Command line options
The command line options when running under Windows are identical to the command line options when running under Linux / UNIX described in section Command line options.
Installation under z/OS
Prerequisites
The installation of the file bridge server requires establishing specific files on the mainframe and granting various authorizations.
RACF
The file bridge server is executed as a started task (STC), which has the default name FIBRPROC.
To run properly a started task needs certain RACF authorization:
-
The
FIBRPROCstarted task needs aRACFuser assigned –<stc-userid>. -
The started task user needs read access to the
RACFclassFACILITYin the profileBPX.SERVER.This can be done by issuing the following command:PERMIT BPX.SERVER - ACCESS(READ) - CLASS(FACILITY) - ID(<userid>)
-
The load library of the java virtual machine executable must be contained in the profile * of the PROGRAM class. This can be granted by the
RACFcommand:RALTER PROGRAM * ADDMEM('<Library>') -
If the
DFSORTutility is used by the server, theICEAM2module must be program authorized. This access can be granted with the RACF command:RALTER PROGRAM * ADDMEM('SYS1.SICELINK')
To complete the RACF setup a REFRESH is required. This can be done by issuing the command:
SETROPTS WHEN(PROGRAM) REFRESH
Java
The file bridge server component needs the IBM Java SDK for z/OS version 7 or higher. The java runtime environment need only be configured to run Java SE programs.
XDM provides the respective JCL jobs to invoke the file bridge server and the required JCL procedures to call the Java virtual machine. These files must be modified according to system conventions/settings. When in doubt, check with your system administrator.
OMVS
The file bridge server component is written in Java. The Java virtual machine on z/OS expects Java programs to be stored on a zFS file system. The file bridge server jar files must be stored on a zFS file system with sufficient free space. The file bridge binary files require at least 100 MB free space.
Upload and Installation of the Software Distribution
The software package provided by UBS Hainer GmbH contains the product documentation and a binary host installation file.
The installation file has the naming convention
JDBCSRV.XMIT.BIN.
It is part of the XDM installation ZIP file.
This file can be used to create a new installation of the file bridge server or to update an existing installation to the latest release level.
For historical reasons the file bridge server installation package uses the high level qualifier JDBCSRV.
|
The installation file must be uploaded to a sequential data set on the host. FTP or IND$FILE can be used to transfer the file.
The data set attributes must be LRECL=80, RECFM=FB.
The file should be uploaded in binary mode to avoid data corruption due to ASCII-EBCDIC translation.
The installation data set requires approximately 700 tracks of space.
The installation is in TSO/E XMIT format. It can be unpacked by entering the following TSO command:
RECEIVE INDS('JDBCSRV.XMIT.DyymmddF.BIN')
Alternatively, the command can be executed from the ISPF data set list (ISPF Menu Option 3.4) by entering the following line command in front of the data set:
RECEIVE INDS(/)
The RECEIVE command will issue the following message:
INMR906A Enter restore parameters or 'DELETE' or 'END'
Create a target data set name by entering the following reply:
DSN('JDBCSRV.XMIT.DyymmddF')
The name of the data set is arbitrary, the name above is merely an example. The result of the receive operation is a new partitioned data set containing a number of members.
For the remaining installation process, the TSO profile option
PROMPT must be active.
If the profile option PROMPT is inactive, you will see the following error message during the installation process:
ERROR 12: Failed to receive file
JDBCSRV.XMIT.D160101F(CNTL)
If you receive the above error message, activate the PROMPT
option by executing the TSO command PROFILE PROMPT, then re-run the installation program.
To invoke the file bridge server install/update program, go to the data set list via the ISPF option menu 3.4. Navigate to the data set that was created in the previous step.
In front of this data set, enter the line command EX.
You will see a panel where you can enter the high level qualifier for the file bridge server installation.
When you press ENTER, you will see the panel shown in figure
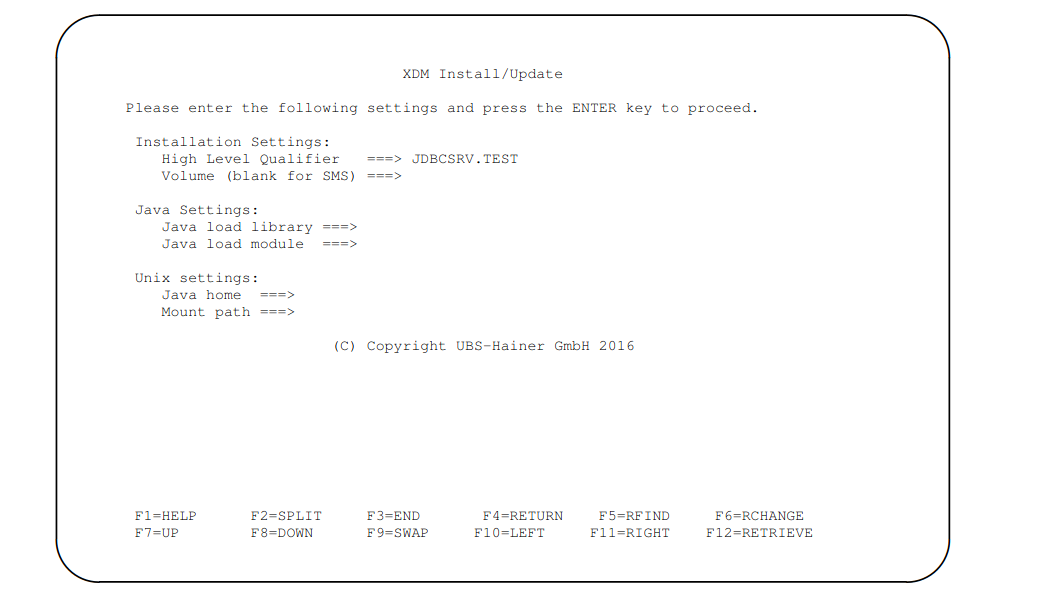
This panel contains all the settings that are required for installation of the file bridge server. The fields have the following meaning:
- High Level Qualifier
-
he high level qualifier for the file bridge server software distribution data sets and libraries. One more qualifier will be added by the installation process, in order to build the required file bridge server library names,
<HLQ>.CNTL.It is not necessary to include quotes when specifying the high level qualifier. The installation routine will implicitly assume quotes. You should take this into consideration if your TSO profile has prefix on, and you want to install the file bridge server under your user qualifier, in which case you should also specify your user qualifier in this field. - Volume
-
The volume serial for the file bridge server software distribution data sets and libraries. If the high level qualifier specified in the previous field causes SMS to automatically select a volume, you may leave this field blank. Otherwise, specify the desired volume serial. This field is only relevant when performing a new installation of the file bridge server. It is ignored when updating an existing installation.
- Java load library
-
The data set name of the z/OS java installation. This data set must contain the Java Virtual Machine load module.
- Java load module
-
The member name of the Java Virtual Machine load module, for example
JVMLDM76. The load module is allocated in the JCL that invokes the Java Virtual Machine. - Java home
-
The path of the java home within the OMVS file system. The path that is specified for this field will be exported as the
JAVA_HOMEUnix System Variable. - Mount path
-
The java files of the file bridge server are shipped as ZFS file system. This field specifies the OMVS folder in which the ZFS file system of the file bridge server will be mounted. The file bridge server installation process will create this folder and will tailor a MOUNT job to mount the file system.
After pressing the ENTER key the installation routine will perform the following tasks:
-
It allocates the following data sets:
- CNTL
-
This data set contains the JCL jobs to invoke the file bridge server. It also contains a member to call the Java Virtual Machine.
- ZFS
-
The file system that contains the java binaries for the file bridge server.
- ISPSLIB
-
The skeleton data set that contains skeletons for the file tailoring.
- STRCTREP
-
This data set represents the file bridge server’s directory. It contains information on the created tablespaces, tables, and columns.
-
It tailors the following JCL jobs and will store them in the CNTL data set:
- MOUNT
-
Job to create the ZFS file system with IDCAMS. The job also creates the mount path directory in OMVS and mounts the ZFS file system.
- SRVRUN
-
JCL to invoke the file bridge server as a job.
- FIBRENV
-
Contains a shell script with environment information for invoking the Java Virtual Machine.
- FIBRPROC
-
JCL procedure which invokes the JVM to start the file bridge server.
-
It will keep track of the installation process and stores that information in the member
HISTORYof the CNTL data set.
Mount the ZFS File System
The member <HLQ>.CNTL(MOUNT) mentioned above contains the JCL job to perform this task.
This JCL must be edited in that a valid job card must be supplied.
The job card should specify a user with system administrator authorization, otherwise the mount path directory cannot be created.
The path specified for the mount point will correspond to the mount path entered during installation.
If this needs to be changed after performing the installation, it must also be changed in the <HLQ>.CNTL(FIBRENV) member.
The mounted file system is used for the file bridge server software. It is not required as workspace or for table data. The default space parameters are therefore sufficient.
zFS File System Permissions
The STC user specified in RACF section must, at the very least, have the authority to read the zFS file system. This is achieved by setting the permissions for the directory which specifies the mount point in OMVS. To prevent accidental changes to the server installation, we recommend making the STC user the owner of this directory and its contents. The required Unix commands are:
chown -R <stc-userid>[:<stc-group>] <mount-path>

chmod -R 775 <mount-path>
Run the file bridge server
The file bridge server can be run as a simple job to verify that the installation is working correctly.
This is found in the
<HLQ>.CNTL(SRVRUN) member.
However, this is not the recommended mode of operation.
Under normal circumstances the file bridge server would be run as a started task.
The installation provides the JCL procedure <HLQ>.CNTL(FIBRPROC).
This procedure should be copied to a public procedure library (e.g. SYS1.PROCLIB).
The file bridge server can then be started with the MVS operator command:
s FIBRPROCThe started task user requires the authorization described in RACF section.
Failure to do this results in the following error message on DD:SYSOUT:
JVMJZBL1042E JZOS batch launcher failed, return code=101Command line options
The command line options when running under z/OS are identical to the command line options when running under Linux / UNIX described in section Command line options.
In addition, the following command line option exists under z/OS:
| Long name | Short name | Description |
|---|---|---|
|
|
Specifies that WTO messages are printed when server starts and ends (MVS only). This option does not require a value. |
WTO messages
When the command line option --wto (short name -o) is specified, the File Bridge server writes the following messages to the operator console:
| Message number | Description |
|---|---|
UBSFBR01 |
This message is printed when the File Bridge server starts. |
UBSFBR02 |
This message is printed when the File Bridge server ends. |
The WTO messages use routing code 2 (Operator Information) and descriptor code 6 (Job Status).
First time connection
When setting up the file bridge server connection for the first time, there will be no authorized users on the system.
The initial connection must therefore be made with the <stc-userid>
specified for the started task.
With this connection it is then possible to grant privileges to other users.
In particular users must have read and write access to tables in the SYSUBS
schema.
Update the server
The update procedure for the host installation of the File Bridge server with a new JAR is to exchange the JAR file in the OMVS directory.
-
The JAR file is supplied with each XDM package and packed into the
xdm-installation.zip -
Extract the
xdm-installation.zipfile on your local PC -
Transfer the
filebridge-server-<version>.jarinto the path specified as Mount path during the installation -
Stop the File Bridge server process or started task
-
Rename the
filebridge-server-<version>.jartoJDBCServer.jar. The existing file may be renamed to be able to rollback the update. -
Start the File Bridge server process or started task