Row Level Processing Tasks
Using Row Level Processing
In many projects you do not want to copy entire tables or whole schemas into a test Environment. Instead, you need just enough data to reproduce and test a specific business case.
Typical examples are:
-
One customer and all their related contracts, invoices and payments.
-
One employee and all related HR records, assignments and history data.
-
One insurance policy and all associated claims and premium information.
In such situations, copying all rows of all involved tables would be slow, would consume a lot of storage, and would often violate data protection rules. You only want those rows that belong to a clearly defined test case.
This is exactly what a Row Level Processor Task is designed for. A Row Level Processor Task copies a consistent subset of rows from the source to the target Environment.
For this tutorial, the goal is different:
We only want to copy selected rows that form one or more test cases. We need XDM to automatically follow relationships between tables, so that all dependent rows are copied as well. We want to avoid copying large volumes of unrelated data.
Creating the Row Level Processor Copy Task
With all the preliminary work done, it is now possible to create a Row Level Processing Task. As with Table Copy Tasks, in order to define a Row Level Processing Task we need to define a Template first, and then create the Task itself which is derived from that template.
To create the Row Level Task Template:
-
In the left sidebar, click the menu category Tasks to expand the tasks menu. Then click the menu item Task Templates.
-
In the tab Row Level Processing, click the button
 on the left side of Row Level Processor Task Templates to expand the list. Initially,
the list may be empty.
on the left side of Row Level Processor Task Templates to expand the list. Initially,
the list may be empty. -
Click the button + Create. A panel titled Create Row Level Processor Task Template opens. Enter the following information:
Name
Copy employees by department name -
Click the button Create and edit.
-
Under the panel Source/Target Environments, click Source Environment and select Production HR Environment from the drop-down box.
Leave the target Environment unspecified. The target Environment will be chosen when the actual task is created. -
In the top panel, click the tab Start Conditions. Under Row Selection Mode, select Query.
The field Start Condition already contains a blueprint for a SELECT query. We need to complete the query by adding a valid WHERE condition. For now, we are going to hard-code a department name into the WHERE condition. We will later change the department name to a placeholder that can be set upon Task execution. Change the contents of the field so that it looks as follows:
SELECT ${uniqueRowIdentifier} FROM "${startTableSchema}"."${startTableName}" "T" WHERE dept_name = 'Customer Service' -
In the top panel, click the tab Target Options. Make sure that the value for the option Fill mode is set to Insert and on key collision discard source rows.
This setting will become relevant later when we run a second row level processor task that copies a different department into the same set of target tables. -
Click the button Save Changes
Now that the Task Template has been created, we can define the actual task:
-
In the bottom expandable panel Tasks, select the tab Tasks and click the button + Create.
-
Enter the following information:
Target Environment
Select Testing HR Environment qa2 from the drop-down box
Name
Copy employees by department name to qa2 -
Click the button Create and edit.
-
Optional: In the field Description under the tab Task Information, enter a description for the new task.
-
Click the button Save Changes.
The first Row Level Processor Task is now defined. Note that unlike table copy tasks, in Row Level Processor Tasks you do not need to add Mapping Rules to specify the schema of the target tables. The schema name is taken from the specified target Environment.
Executing the Row Level Processor Task
To execute your first Row Level Processor Task:
-
In the left sidebar, click the menu category Tasks to expand the tasks menu and select the menu item Task Templates.
-
Click the button
on the left side of Row Level Processor Task Templates to expand the list of templates.
Click the button next to Copy employees by department name to expand the list of tasks. Locate the
task Copy employees by department name to qa2 and click the button
. -
In the right sidebar, click the button Execute. A dialog window opens. Leave Interrupt execution unchecked and click the button Execute and view. This will schedule the task for immediate execution and switch the main view to Executed Task.
-
The task runs asynchronously in the background. Every five seconds, the status is refreshed automatically. Within a few minutes the task should finish.
-
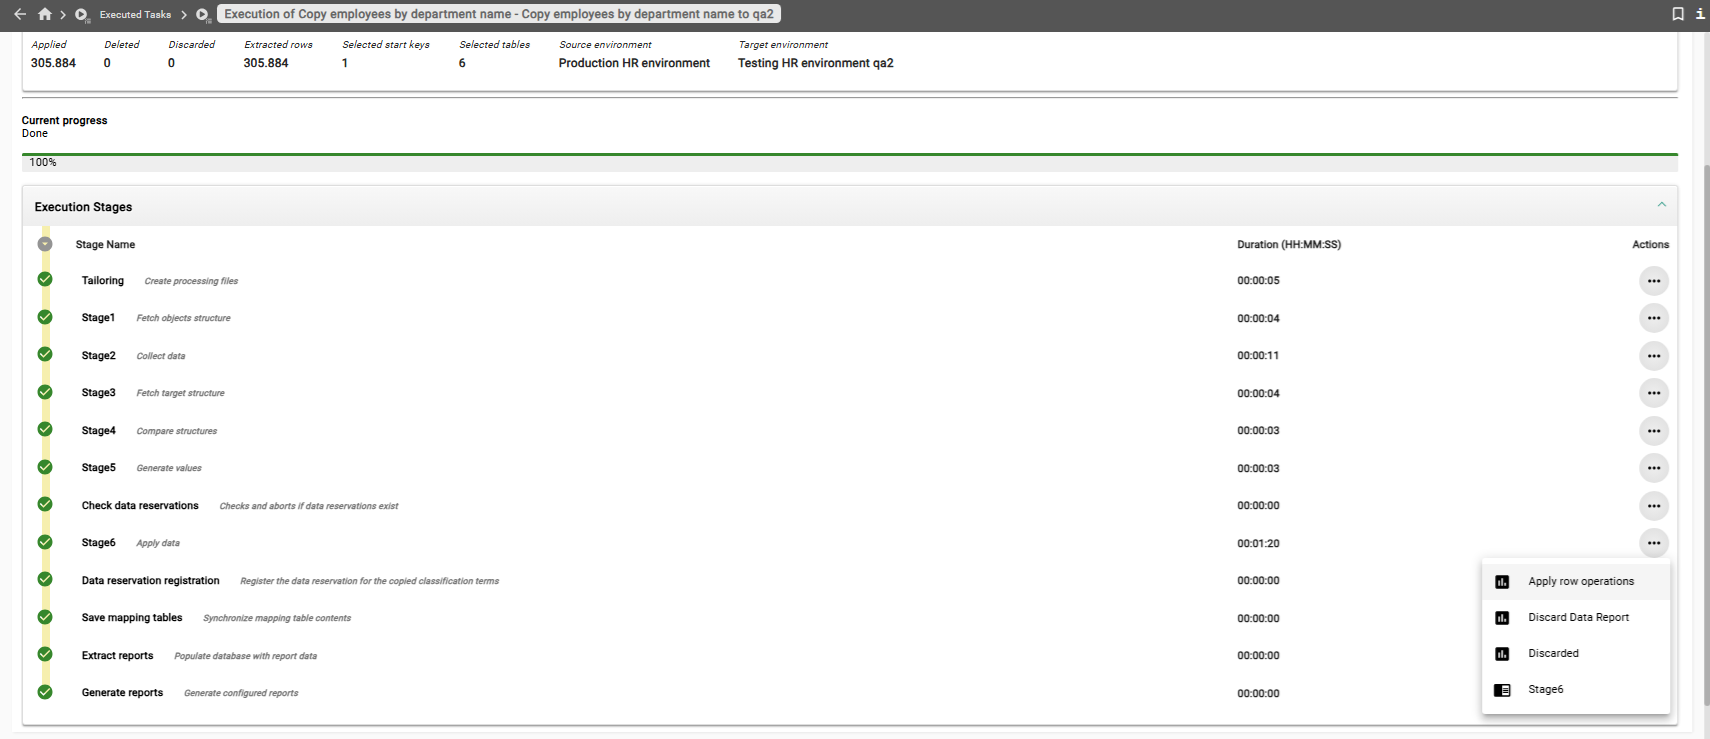
In the top left corner, the task status should show as COMPLETE.
You now have one department (Customer Service) with all its employees,
including the job title history and salary history, in the schema qa2.
In addition, XDM has also copied the information as to who was manager of that
department in the past. After the copy processes finishes, examine the tables
in the schema qa2. The number of rows that were inserted into the target tables by this Row Level Processor Task
can be verified as follows:
-
In the rows with the stage name Stage6 - Apply data, click the button with the three dots in the rightmost column of the table. Then select Apply row operations.
| Table | Number of rows |
|---|---|
|
1 |
|
23580 |
|
4 |
|
23580 |
|
223644 |
|
35075 |
Previous section: Application Models and Environments | Next section: Using Custom Parameters