Using Custom Parameters
Using a Custom Parameter
In the first version of the Row Level Processor Task, the department name is hard‑coded in the SQL query. This works for a single demonstration, but it quickly becomes a problem in real projects:
-
You would need to create a separate Task Template for every department.
-
Any change to the selection logic would have to be applied to all these Templates.
-
End users cannot easily choose which department to copy when they start the task.
To avoid this, XDM allows you to define Custom Parameter on the Task Template. A Custom Parameter is a named value that can be filled when the Task is executed. In our example, the department name is no longer written directly into the SQL statement. Instead, the SQL contains a placeholder, and XDM replaces this placeholder with the current value of the Custom Parameter at runtime.
This has several advantages:
-
The selection logic stays in one place – in the Task Template – and does not have to be duplicated.
-
Different tasks can use the same template, but copy different departments by supplying different parameter values.
-
The same parameter can later be exposed in the Data Shop or via the REST API, so that non‑technical users or external tools can control which department is copied without editing SQL.
In short, we introduce a Custom Parameter in this tutorial because it turns a single hard‑coded example into a reusable, flexible solution that can be used for many departments with the same underlying Task Template.
Creating a Custom Parameter
-
Select the menu category XDM Configuration and click the menu item Custom Parameters. Then click + Create.
-
In the panel New Custom Parameter, enter the following information:
Name
Department NameDescription
Please enter the exact name of the departmentVariable
Parameter Type
Select String from the drop-down list
Default Value
(leave empty)
Requirement Level
Select RUNTIME from the drop-down list
Validation Type
Select None from the drop-down list
Validation Expression
(leave empty)
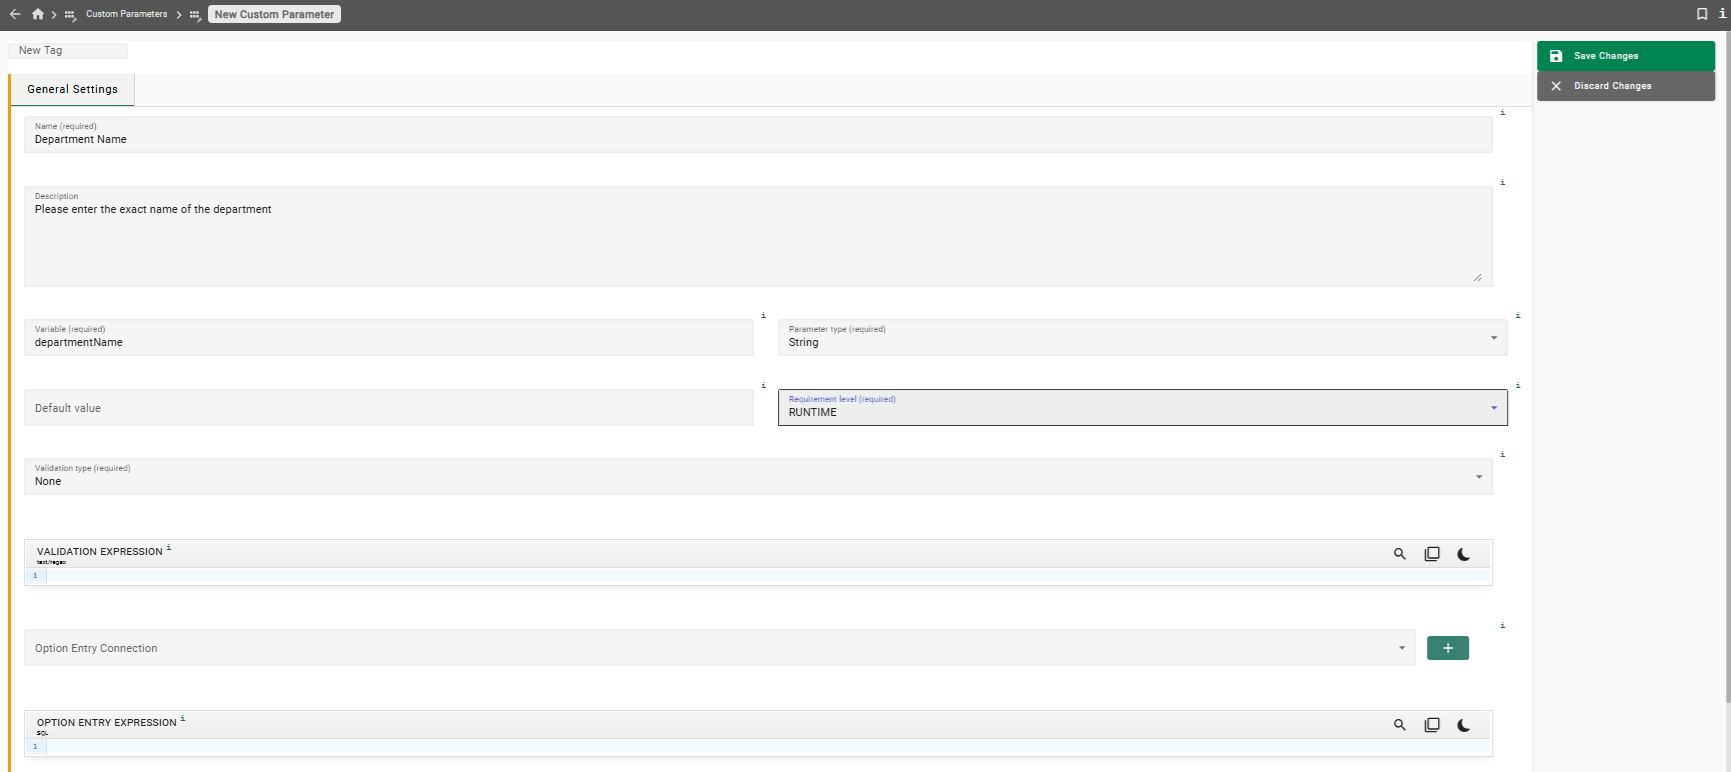
-
Click the button Save Changes.
We can now use this Custom Parameter in task templates.
Using a Custom Parameter in a Task Template
-
In the left sidebar, click the menu category Tasks to expand the tasks menu and select the menu item Task Templates.
-
In the tab Row Level Processing, click the button
 on the left side of Row Level Processor Task Templates to expand the list.
Locate the Task Template Copy employees by department name and click the button next to the template name.
on the left side of Row Level Processor Task Templates to expand the list.
Locate the Task Template Copy employees by department name and click the button next to the template name. -
Click the button Edit. Then, in the top panel, select the tab Custom Parameter and click the button Configure Custom Parameters.
-
In the dialog window Custom Parameter Activation, search for the name of your Custom Parameter in the search bar and select Department Name to add the Custom Parameter to the Task Template. Click the button Apply.
-
In the Department Name text field, which is now visible, enter "Customer Service"
Whenever a Row Level Processor Task Template already contains a task, any Custom Parameter specified in the Task Template with requirement level set to RUNTIME must have a value assigned, otherwise the Custom Parameter cannot be saved. -
Click the button Save Changes.
The Task Template now has a Custom Parameter with the desired department name. All Tasks that are derived from this template require the department name as a value for this parameter, otherwise the tasks cannot run. If no value is assigned at the task level, then the Task Template value is used.
We now need to use the Custom Parameter in the SQL query in our start condition.
-
In the top panel, select the tab Start Conditions. You will see the text field with the SQL query that currently still contains a constant value for the department name.
-
Click the button Edit and change the contents of the field to the following:
SELECT ${uniqueRowIdentifier}
FROM "${startTableSchema}"."${startTableName}" "T"
WHERE "T".dept_name = '${departmentName}'
The expression
${departmentName}at the end of the query is a placeholder for the value of a parameter. Placeholders always start with a dollar symbol, followed by the internal name of the desired parameter in braces. In this case, the actual value of the parameterDepartment Name, whose internal variable name isdepartmentName, will be inserted when the task is executed.Make sure to retain the apostrophes around the expression ${departmentName}. The department name is later inserted via textual replacement. If the apostrophes are missing, the resulting query will not be valid. -
Click the button Save Changes.
Supplying a value for a Custom Parameter in a task
A value for the Custom Parameter can now be set at task level. We previously copied the department "Customer Service" and its employees to the qa2 environment. We now want to copy the department "Research" and its employees into the same target tables so the data from both copy processes are merged.
-
In the left sidebar, click the menu category Tasks to expand the tasks menu and select the menu item Task Templates.
-
In the tab Row Level Processing, click the button
on the left side of Row Level Processor Task Templates to expand the list. Select
Copy employees by department name by clicking the button next to the template’s name. Locate the task Copy employees by
department name to qa2 in the tab Tasks in the expandable panel Tasks and click the button on the left side of the task name. -
Click the button Edit and select the tab Properties to overwrite in the top panel. Click the button Add Property and choose the property Department Name. You will be presented with a text field for the Custom Parameter value. Enter "Research" into this text field and click the button Apply.
The query is case-sensitive, so make sure to enter the value "Research" exactly as it is shown here. Otherwise, the query will match no rows. Any extra characters will also result in no matches. -
Click the button Save Changes
Now the Task Template introduces the Custom Parameter and the task provides the value.
The task is now ready to run.
Executing the Row Level Processor Task
To execute your second Row Level Processor Task:
-
On the panel to the right, click the button Execute or while in your Task Template, locate the task in the bottom panel under the tab Tasks and click the execute button (
 ) on the right.
-
Alternatively: In the left sidebar, click the menu category Tasks to expand the tasks menu and select the menu item Task Templates.
-
Click the button
on the left side of Row Level Processor Task Templates to expand the list. Select Copy employees by department name by clicking the button next to the templates name. Locate the task Copy employees by department name to qa2 in the tab Tasks in the expandable panel Tasks and click the button on the left side of the task name. -
In the right sidebar, click the button Execute.
-
-
A dialog window opens. Leave Interrupt execution unchecked and click the button Execute and view. This will schedule the task for immediate execution and switch the main view of Executed tasks.
-
The task runs asynchronously in the background. Every five seconds, the status is refreshed automatically. Within a few minutes the task should finish.
-
In the top left corner, the task status should show as COMPLETE.
After the task finishes, the schema qa2 contains data from two departments:
Customer Service, which was copied earlier, and Research. The number of
rows that were inserted into the target tables by this Row Level Processor Task
can be verified as follows:
-
Find the row Stage6 - Apply data, click the button with the three dots in the rightmost column of the table. Then select the button Apply row operations.
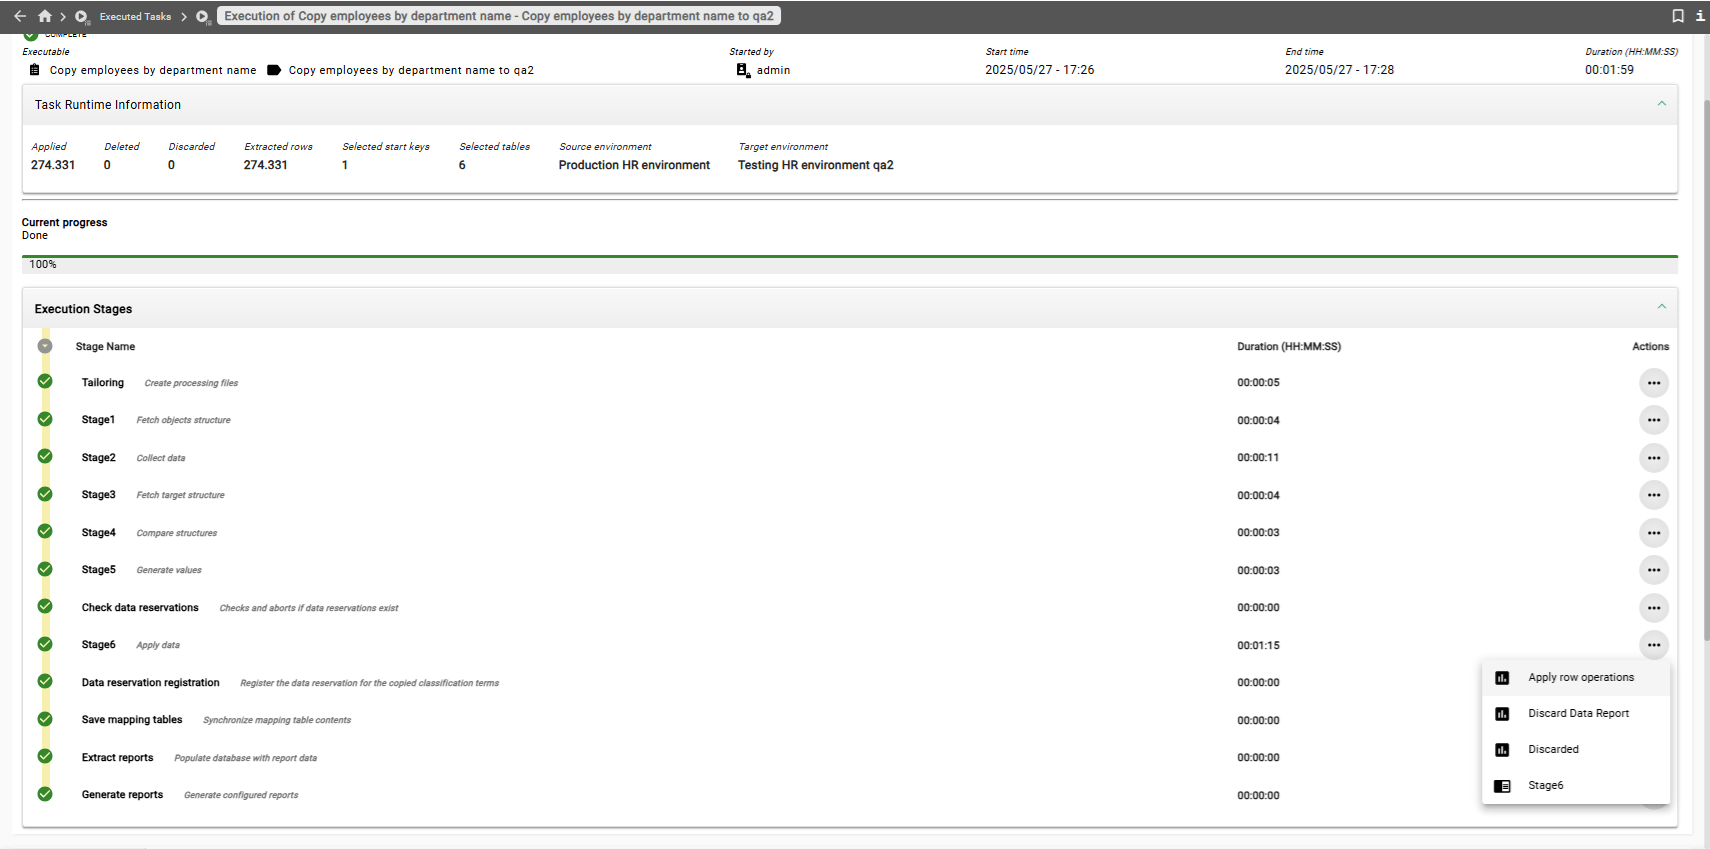
-
A panel will appear that shows the number of apply, delete and discard operations that were executed against each of the participating tables. You should not see any deletes, discards or cascade discards, and you should see the following number of apply operations:
Table Applied departments1
dept_emp21126
dept_manager2
employees21126
salaries200615
titles31461
Now that two Row Level Processor Tasks have been executed, the total number
of rows in the tables in the qa2 schema should be as follows:
| Table | Number of rows |
|---|---|
|
2 |
|
44706 |
|
6 |
|
44706 |
|
424259 |
|
66536 |
Previous section: Row Level Processing Tasks | Next section: Data Shops